Pages

Thursday, April 30, 2009

A Logo, An Art Auction.....With a Twist

Val of More Than Burnt Toast and I would like to take this opportunity to thank you for your continued support and involvement in raising money for the World Food Program (WFP). As food bloggers, we have the good fortune of having the means to not only eat quality food but to share our recipes and food-related experiences with others around the world. BloggerAid began as a vehicle to create an opportunity for bloggers all over the world to band together to help change the face of famine. Consistent with the original mission, the work of BloggerAid - Changing the Face of Famine at it's new location here will continue to be a hub for our combined efforts to raise awareness and funds for the WFP.

With nearly 140 submissions, the BloggerAid Cookbook is currently one of our main focuses. We have a dedicated and enthusiastic team of members devoted to editing the cookbook. Editing began this week. If you are interested in helping out with this ambitious project please let us know. Our plan is to raise funds for the WFP’s School Meals program by selling the cookbook internationally starting in November.

In a continued effort to meet our goals we present:


Art Auction with a Twist


We met Lisa Orgler as foodie friends on FoodBuzz and she has generously agreed to create an art piece from one of YOUR food photographs and donate it to Bloggeraid - Changing the Face of Famine. Her love for food, art and journaling have brought her to blogging and driven her to create art from food creations. On her blog, Lunchbox Project, Lisa reaches out to fellow bloggers to create a masterpiece from your own photography. The final piece that she has so generously donated to BloggerAid will be displayed on the site for silent auction with the proceeds to the School Meals Program.

Lisa is an award-winning artist and designer and has been creating innovative landscapes and media for over ten years. She earned her Bachelor and Master’s degrees in Landscape Architecture from Iowa State University. Her energetic presentations and fresh perspective make her a popular choice for garden design and art talks across the country. Her current project is writing a book on out-of-the ordinary garden design.

So put your thinking caps on!!! Let your fingers walk you over to Lisa's blog Lunchbox Project but for more details about the auction visit our site here .

Monday, April 27, 2009

Daring Bakers April Challenge


The April 2009 challenge is hosted by Jenny from Jenny Bakes . She has chosen Abbey's Infamous Cheesecake as the challenge.
Is it wrong to be in love with a cake? If it is, read no further - just look at the pictures. I've made my fair share of cheesecakes but without question - this one ranks #1 for me. I've always had some issues with cracking on the top. This time - not a one and what a gorgeous silky finish on the top.

My choice of topping was a simple canned mandarin with cointreau and fresh strawberries.

Abbey's Infamous Cheesecake
:

crust:

2 cups / 180 g graham cracker crumbs
1 stick / 4 oz butter, melted
2 tbsp. / 24 g sugar
1 tsp. vanilla extract

cheesecake:

3 sticks of cream cheese, 8 oz each (total of 24 oz) room temperature
1 cup / 210 g sugar
3 large eggs
1 cup / 8 oz heavy cream
1 tbsp. lemon juice
1 tbsp. vanilla extract (or the innards of a vanilla bean)
1 tbsp liqueur, optional, but choose what will work well with your cheesecake

DIRECTIONS:

1. Preheat oven to 350 degrees F (Gas Mark 4 = 180C = Moderate heat). Begin to boil a large pot of water for the water bath.

2. Mix together the crust ingredients and press into your preferred pan. You can press the crust just into the bottom, or up the sides of the pan too - baker's choice. Set crust aside.

3. Combine cream cheese and sugar in the bowl of a stand-mixer (or in a large bowl if using a hand-mixer) and cream together until smooth. Add eggs, one at a time, fully incorporating each before adding the next. Make sure to scrape down the bowl in between each egg. Add heavy cream, vanilla, lemon juice, and alcohol and blend until smooth and creamy.

4. Pour batter into prepared crust and tap the pan on the counter a few times to bring all air bubbles to the surface. Place pan into a larger pan and pour boiling water into the larger pan until halfway up the side of the cheesecake pan. If cheesecake pan is not airtight, cover bottom securely with foil before adding water.

5. Bake 45 to 55 minutes, until it is almost done - this can be hard to judge, but you're looking for the cake to hold together, but still have a lot of jiggle to it in the center. You don't want it to be completely firm at this stage. Close the oven door, turn the heat off, and let rest in the cooling oven for one hour. This lets the cake finish cooking and cool down gently enough so that it won't crack on the top. After one hour, remove cheesecake from oven and lift carefully out of water bath. Let it finish cooling on the counter, and then cover and put in the fridge to chill. Once fully chilled, it is ready to serve.

Pan note: The creator of this recipe used to use a springform pan, but no matter how well she wrapped the thing in tin foil, water would always seep in and make the crust soggy. Now she uses one of those 1-use foil "casserole" shaped pans from the grocery store. They're 8 or 9 inches wide and really deep, and best of all, water-tight. When it comes time to serve, just cut the foil away.

Prep notes: While the actual making of this cheesecake is a minimal time commitment, it does need to bake for almost an hour, cool in the oven for an hour, and chill overnight before it is served. Please plan accordingly!

Some variations from the recipe creator:

** Lavender-scented cheesecake w/ blueberries - heat the cup of heavy cream in the microwave or a saucepan until hot but not boiling. Add 2 tbsp of lavender flowers and stir. Let lavender steep in the cream for about 10-15 minutes, then strain the flowers out. Add strained cream to cheesecake batter as normal. Top with fresh blueberries, or make a quick stovetop blueberry sauce (splash of orange juice, blueberries, a little bit of sugar, and a dash of cinnamon - cook until berries burst, then cool)


** Cafe au lait cheesecake with caramel - take 1/4 cup of the heavy cream and heat it in the microwave for a short amount of time until very hot. Add 1-2 tbsp. instant espresso or instant coffee; stir to dissolve. Add this to the remainder of cream and use as normal. Top cheesecake with homemade caramel sauce (I usually find one on the food network website - just make sure it has heavy cream in it. You can use store-bought in a pinch, but the flavor is just not the same since its usually just sugar and corn syrup with no dairy).

** Tropical – add about a half cup of chopped macadamias to the crust, then top the cake with a mango-raspberry-mandarin orange puree.

** Mexican Turtle - add a bar of melted dark chocolate (between 3 and 5 oz., to taste) to the batter, along with a teaspoon of cinnamon and a dash of cayenne pepper (about 1/8 tsp.). Top it with pecan halves and a homemade caramel sauce.

** Honey-cinnamon with port-pomegranate poached pears – replace 1/2 cup of the sugar with 1/2 cup of honey, add about a teaspoon or more (to taste) of cinnamon. Take 2 pears (any variety you like or whatever is in season), peeled and cored, and poach them in a boiling poaching liquid of port wine, pomegranate juice/seeds, a couple of "coins" of fresh ginger, a cinnamon stick, and about a 1/4 cup of sugar. Poach them until tender, then let cool. Strain the poaching liquid and simmer until reduced to a syrupy-glaze consistency, then cool. Thinly slice the cooled pears and fan them out atop the cooled cheesecake. Pour the cooled poaching syrup over the pears, then sprinkle the top with chopped walnuts and fresh pomegranate seeds.

Some variations from Jenny (from JennyBakes):

**Key lime - add zest from one lime to sugar before mixing with cream cheese. Substitute lemon juice, alcohol, and vanilla with key lime juice.

**Cheesecakelets - put in muffin tins, ramekins, or custard cups. Try baking 20-35 minutes, or until still a little jiggly, and cool as before.

Thursday, April 23, 2009

Peanut Butter Banana Bars

The hunt begins for flowers for the wedding. The florist I spoke to said that a simple arrangement, like the one you see here with a bit of flare (not much, I swear), will cost between $35-45.


I don't get that? Do they sneak gold into the pedals? Sounds like Giz and I are going to make the arrangements ourselves.

What I'd really like is something like this (sorry, this is a link to the source of the flower picture below, but you have to register for the site to actually view the picture), but in burgundy and with fewer flowers (maybe five).

Do you have any experience with flowers? If I were to do this myself, what price should I anticipate? Where would you suggest looking for square vases like this?

Now...for today's post. This recipe was inspired by both R, who seems to get very stressed at the sight of bananas turning black and Ben, who is hosting his third homemade event.


Peanut Butter Banana Bars
Recipe Zaar

Ingredients
1 egg (or equivalent in egg substitute)
1/4 cup reduced-fat peanut butter
1 cup banana, ripe mashed (3 medium)
1/4 cup skim milk
2 tablespoons sugar substitute (I just used regular sugar)
1 cup flour (I used 50-50 whole wheat to all purpose flour)
1 teaspoon baking powder
1/2 teaspoon baking soda

Directions
Preheat oven to 350 degrees. Spray an 8 X 8 pan with butter flavored cooking spray. In a large bowl, combine egg, peanut butter and bananas. Mix well. Stir in milk. In a small bowl, combine sugar substitute, flour, baking powder and baking soda. Add to wet mixture slowly. Evenly spread battter into prepared pan. Bake for 20 minutes. Cut into 8 bars (I cut the portions into 16 - which would make pieces half the size of the pictures here). I also added chocolate chips. Not in the recipe - but how can you go wrong with peanut butter banana and chocolate chips?

NOTE: Make sure your sugar substitute can be used for baking.


Verdict - oh yeah baby. These are good. I had one and put the rest in the freezer for R's lunches. I was worried that it would lack sweetness, but it really doesn't.

Wednesday, April 22, 2009

Nuria's Lamb Brochettes


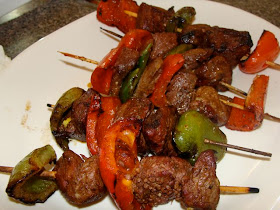
Inspired by Nuria from Spanish Recipes I thought her lamb skewers for the BBQ looked just mouth watering. The next thing I knew I was at the meat counter buying lamb and the rest is history. In our family there's no such thing as moderation when it comes to backyard barbeque so in addition to the lamb we threw in some chicken just to make sure nobody went hungry and you just never really know when another 15 people might just happen upon your doorstep.


nope...not done yet


Pathetic, don't you think? There were only 6 of us for dinner. This obsession as Psychgrad once said is totally baba's doing. During WWII when they had next to nothing to eat she swore her family would never go hungry. She lived by her promise... and then some.

Lamb Brochettes


Ingredients for 4 servings: 600 grs of lamb cut in dices (ask your butcher for a tender piece), 2 garlic cloves, 1 cup of red wine, 1 cup of water, 1 cup of extra virgin olive oil, 1 tablespoon of sweet red ground paprika, 1 teaspoon of hot red ground paprika, 1 teaspoon of dry oregano, 1 bay leave, 1 tablespoon of cumin seeds, salt and black ground pepper. One red pepper and one green pepper.
• Peel the garlic cloves and chop thinly. Place in a big bowl together with the wine, water, olive oil, the paprika, oregano, chopped bay leave, cumin and pepper. Mix well.
• Clean the lamb meat and take the fat away, cut in dices and place inside the bowl. Let marinate for at least 4 hours. I had mine in the fridge overnight and cooked the next day. Meat will be more tender the longer it marinates.
• If you use wooden sticks, have them soaking in water so that they don't burn when you cook the skewers.
• Insert lamb dices and red/green peppers with the stick.
• Cook in your barbecue or in the griddle or grill in your oven until they get golden. While cooking, pour some of the marinating liquid on top and turn so that they get all done.

Verdict: Incredible flavour and the aroma from the marinating sauce is wonderful.

We have recently been the recipients of a couple of awards.


Hope from Hopie's Kitchen What a great award and many thanks for thinking of us.


The rules for this award say to
Include the award logo in your blog or post.
Nominate as many blogs which show adorability, cuteness and charm.
Be sure to link to your nominees within your post.
Let them know that they have received this award by commenting on their blog.
Share the love and link to this post and to the person from whom you received your award.The rules for this award say to:

We'd like to share this award with:

Maryann of Finding La Dolce Vita
Joan of Foodalogue
Steph at Obsessed with Baking
Cindy from Cindystar
Heather from Girli Chef


And a big thanks to Melissa from Alosha's Kitchen for this beautiful award.

The award is for our blogging sisters who show great attitude/gratitude. The Rules for the recipient: 1. Put the logo on your blog or post. 2. Nominate up to 10 blogs which show great attitude and/or gratitude 3. Be sure to link to your nominees within your post. 4. Let them know that they have received this award by commenting on their blog, or sending them an email. 5. Remember to link to the person from whom you received your award.

Val from More Than Burnt Toast
Jeanne from Cook Sister
Cynthiafrom Tastes Like Home
Nuria from Spanish Recipes
Grace from A Southern Grace

Monday, April 20, 2009

Lemon Cream Tart

Last week was a big week... One of the biggest, you could say.


No. Nobody died. I just got a lot of flowers. I successfully defended my thesis and am now, officially "Dr. Psychgrad".


Thank God that's done with. I had been stressing about the defence since starting graduate school five and a half years ago.

For a celebration event, I made a tart. My first tart. I splurged on a tart and some tartelette pans.


I was ecstatic to find meyer lemons at the grocery store for the first time. Without a recipe in mind, I picked up a pack. I should make a point of encouraging the store management to continue bringing in meyer lemons.


I followed Dorie Greenspan's recipe for a lemon cream tart, a recipe she leared to make from Pierre Hermé


Lemon Cream
1 cup sugar
Finely grated zest of 3 lemons
4 large eggs
1/2 cup fresh lemon juice (from 4-5 lemons)
2 sticks plus 5 tablespoons (10-1/2 ounces) unsalted butter, cut into tablespoon-size
pieces, at room temperature

Getting Ready: Have an instant-read thermometer, a strainer and a blender (first choice) or food processor at hand. Bring a few inches of water to a simmer in a saucepan.

Put the sugar and zest in a large heatproof bowl that can be set over the pan of simmering water. Off the heat, rub the sugar and zest together between your fingers until the sugar is moist, grainy and very aromatic. Whisk in the eggs, followed by the lemon juice.


Set the bowl over the pan, and start stirring with the whisk as soon as the mixture feels tepid to the touch. Cook the lemon cream until it reaches 180 degrees F. As you whisk—you must whisk constantly to keep the eggs from scrambling—you'll see that the cream will start out light and foamy, then the bubbles will get bigger, and then, as it gets closer to 180 degrees F, it will start to thicken and the whisk will leave tracks. Heads up at this point—the tracks mean the cream is almost ready. Don't stop whisking or checking the temperature, and have patience—depending on how much heat you're giving the cream, getting to temp can take as long as 10 minutes.

As soon as it reaches 180 degrees F, remove the cream from the heat and strain it into the container of the blender (or food processor); discard the zest. Let the cream stand, stirring occasionally, until it cools to 140 degrees F, about 10 minutes.


Turn the blender to high (or turn on the processor) and, with the machine going, add the butter about 5 pieces at a time. Scrape down the sides of the container as needed as you incorporate the butter. Once the butter is in, keep the machine going—to get the perfect light, airy texture of lemon-cream dreams, you must continue to blend the cream for another 3 minutes. If your machine protests and gets a bit too hot, work in 1-minute intervals, giving the machine a little rest between beats.

Pour the cream into a container, press a piece of plastic wrap against the surface to create an airtight seal and refrigerate for at least 4 hours or overnight. (The cream will keep in the fridge for 4 days and, or tightly sealed, in the freezer for up to 2 months; thaw it overnight in the refrigerator.)

When you are ready to assemble the tart, just whisk the cream to loosen it and spoon it into the tart shell. Serve the tart, or refrigerate 'until needed.

Serving: It's a particular pleasure to have this tart when the cream is cold and the crust is at room temperature. Dorie also recommends a raspberry or other fruit coulis is nice, but not necessary; so is a little crème fraîche.

Storing: While you can make the lemon cream ahead, once the tart is constructed, it's best to eat it the day it is made. Serve with 1 9-inch tart shell made with Sweet Tart Dough, Sweet Tart Dough with Nuts or Spiced Tart Dough (see book), fully baked and cooled

Sweet Tart Dough
Makes enough for one 9-inch crust

1-1/2 cups all-purpose flour
1/2 cup confectioners' sugar
1/4 teaspoon salt
1 stick plus 1 tablespoon (9 tablespoons) very cold (or frozen) unsalted butter, cut into small pieces
1 large egg yolk

Put the flour, confectioners' sugar and salt in a food processor and pulse a couple of times to combine. Scatter the pieces of butter over the dry ingredients and pulse until the butter is coarsely cut in—you should have some pieces the size of oatmeal flakes and some the size of peas. Stir the yolk, just to break it up, and add it a little at a time, pulsing after each addition. When the egg is in, process in long pulses—about 10 seconds each—until the dough, which will look granular soon after the egg is added, forms clumps and curds. Just before you reach this stage, the sound of the machine working the dough will change—heads up. Turn the dough out onto a work surface and, very lightly and sparingly, knead the dough just to incorporate any dry ingredients that might have escaped mixing.

To press the dough into the pan: Butter a 9-inch fluted tart pan with a removable bottom. Press the dough evenly over the bottom and up the sides of the pan, using all but one little piece of dough, which you should save in the refrigerator to patch any cracks after the crust is baked. Don't be too heavy-handed—press the crust in so that the edges of the pieces cling to one another, but not so hard that the crust loses its crumbly texture. Freeze the crust for at least 30 minutes, preferably longer, before baking.

To partially or fully bake the crust: Center a rack in the oven and preheat the oven to 375 degrees F.

Butter the shiny side of a piece of aluminum foil and fit the foil, buttered side down, tightly against the crust. (Since you froze the crust, you can bake it without weights.) Put the tart pan on a baking sheet and bake the crust for 25 minutes. Carefully remove the foil. If the crust has puffed, press it down gently with the back of a spoon. For a partially baked crust, patch the crust if necessary, then transfer the crust to a cooling rack (keep it in its pan).

To fully bake the crust: Bake for another 8 minutes or so, or until it is firm and golden brown. (I dislike lightly baked crusts, so I often keep the crust in the oven just a little longer. If you do that, just make sure to keep a close eye on the crust's progress—it can go from golden to way too dark in a flash.) Transfer the tart pan to a rack and cool the crust to room temperature before filling.


To patch a partially or fully baked crust, if necessary: If there are any cracks in the baked crust, patch them with some of the reserved raw dough as soon as you remove the foil. Slice off a thin piece of the dough, place it over the crack, moisten the edges and very gently smooth the edges into the baked crust. If the tart will not be baked again with its filling, bake for another 2 minutes or so, just to take the rawness off the patch.


Sweet Tart Dough with Nuts: This dough has a slightly more assertive flavor than Sweet Tart Dough above, but you can use the two interchangeably. For the nut dough, reduce the amount of flour to 1-1/4 cups and add 1/4 cup finely ground almonds (or walnuts, pecans or pistachios).

Storing: Well wrapped, the dough can be kept in the refrigerator for up to 5 days or frozen for up to 2 months. While the fully baked crust can be packed airtight and frozen for up to 2 months, Dorie prefers to freeze the unbaked crust in the pan and bake it directly from the freezer—it has a fresher flavor. Just add about 5 minutes to the baking time.

Much like shortbread, and it's ideal for filling with fruit, custard or chocolate.

The simplest way to make a tart shell with this dough is to press it into the pan. You can roll out the dough, but the high proportion of butter to flour and the inclusion of confectioners' sugar makes it finicky to roll.


Verdict: Overall, I was impressed with the look of the tart. But, I found that the lemon cream filling was too sweet. Maybe it's the meyer lemons that makes it really sweet. But I can't imagine using a normal lemon - seems like it would end up being really tart.(no pun intended) I found the crust to be good-tasting, but a bit too hard to break apart with a spoon/fork. Chewing, it was fine. But, I probably shouldn't have pressed the dough into the pan as hard as I did. I would make the dough again, but probably try another filling that isn't as sweet.

Saturday, April 18, 2009

Cupcake Rescue


Now that Passover has come to an end for another year, it's time to refocus on the wedding. For Seinfeld lovers, I'm thinking the planning of this wedding is starting to sound like the episode where friends keep talking about their baby. Remember that one? Jerry keeps saying, "it's all about THE BABY" (Psychgrad's note: I believe they keep saying, "you gotta see THE BABY". Giz's note: I stand corrected - as usual :) Clearly it's not stopping me from sharing some of the trials and tribulations of attempting to create exactly what Psychgrad would like to see.

Today I'm trying a new recipe for cupcakes. Actually, I took a recipe from the Canadian Living "The Complete Canadian Living Baking Book" called Glazed Lemon Cake, cut the recipe in half and baked it as muffins. Half the recipe netted 14 muffins.

Here's the whole recipe:
Glazed Lemon Cake

Ingredients:

1 cup butter, softened
2 cups granulated sugar
4 eggs
2 Tbsp grated lemon rind
1 tsp vanilla
3 cups all-purpose flour
1 Tbsp baking powder
1/2 tsp salt
1 1/4 cups milk

Topping:

1 1/2 cups Icing Sugar
2 tsp grated lemon rind
1/4 cup lemon juice
I didn't make the glaze - wasn't sure if covering the muffins with icing would make it too goopy (technical culinary term)

Method:

1. Grease 13x9 inch (3.5L) metal cake pan, set aside
2. In large bowl, beat butter with sugar until light and fluffy; beat in eggs, 1 at a time beating well after each. Beat in lemon rind and vanilla.
3. In separate bowl, whisk together flour, baking powder and salt. Using wooden spoon, stir into butter mixture alternately with milk, making 3 additions of dry ingredients and 2 of milk. Scrape into prepared pan; smooth top.
4. Bake in centre of 350 F (180 C) oven until cake tester inserted in centre comes out clean - 35-40 minutes. (22-25 minutes for muffins) Place pan/muffins on rack.


Topping:

In a bowl, whisk together icing sugar, lemon rind and juice. With skewers poke holes at 1 inch (2.5 cm) intervals, all over top of cake. Spoon sugar mixture evenly over top, smoothing with back of spoon. Let cool.

Note: The texture and flavour of these muffins are perfect.

So here's where the "Rescue" part comes in. What I want to create now has to look like this:


Psychgrad's note - Mom - I'm not so convinced that this is the best design. I actually think I like some of the other designs more.
Giz's note: Hey!!! This is my post - other designs can go in your post ...love Mommy Dearest :)
Psychgrad's note: So I guess it isn't really all about the baby then, is it?

For all the accomplished bakers in our blog world:
1. What kind of icing would you use for mid June warm weather?
2. What Wilton tip would you use to create this design?
3. I'm trying to achieve a burgandy colour - what tints of colour would you use to get the right colour - not too dark but not too pinky?

Any other suggestions, ideas, direction would be hugely appreciated.
Also, most of the paper cups I'm seeing are really boring - does anyone have a source for really nice cups?

Tuesday, April 14, 2009

Pancetta: Tortiglioni vs. Orcheiette

Remember the Italian store? The one that started off as a place R didn't want to go into and would wait outside, in frustration... Next step was R coming in the store with me. Week after that, I heard he stopped in while I was out of town (visiting Giz) because it was on his way. Since then, it has been his weekly weekend walk. He makes the 1 hours walk (there and back) to buy buns and lunchmeat for his lunches for the week. Lately, he has been getting pancetta. You can see another pancetta recipes here.

These TWO recipes contain many of the same ingredients, but vary whether it is white wine- or tomato-based. One recipe includes crushed tomatoes and the other chopped. Play with these ingredients, adding herbs and other veggies as you see fit. It makes for a great meal (and leftovers).

Ingredients

2.5 inches pancetta (spicy)
500 g Orcheiette (or any pasta of your choosing)
1 cup of white wine
16 oz crushed tomato
3-4 tomatoes
3 cloves garlic, crushed
2 shallots, finely chopped
tomatoes, chopped
pepper, parsley, basil, oregano (fresh or dried), chopped
parmesan cheese, to taste

Chop the pancetta into small cube shapes. Pan fry them (careful to not burn them). Once pancetta cubes are close to being done, remove and place in papertowel to absorb the fat (that's what I do). In the same pan, fry the garlic and onion, mixing continously. After a minute or so, add the wine and let reduce some. Add the remainder of your ingredients. Once a few minutes from completion, return the pancetta to the pan. Add the herbs. Plate with shredded parmesan cheese over top.

Here's the crushed tomato base:

Tortiglioni Pancetta


Here's the white wine base:

Orcheiette Pancetta


This dish is being sent to Katie at One Little Corner of the World. I've been following Katie's blog for a while now (not in a stalkerish kind of way). Definitely check out her site! Katie is hosting this week's Presto Pasta Night!

So -Which dish would you prefer???

Note: the top picture of tomatoes comes from Tomato Mania.

******************************************
I also wanted to take a second to help spread the word about the third round of Adopt a Blogger.

Kristen at Dine and Dish, who blogs about her recipes, family, daily experiences and the pregnancy of her 4th child, is taking the time to host the third Adopt a Blogger event. We've participated in the first two as a newbie blogger, paired with Redacted Recipes and as a veteran blogger, paired with Hopie's Kitchen.

We're excited to receive a new adoptive blog. Hopie - are you ready for an adoptive sibling?

As you can imagine, there are many newbie bloggers. But there is still need for more veteran foodbloggers. If you're interested in being paired with a new food blogger, let Kristen know. It's a nice way of getting to know other people in the community.

Saturday, April 11, 2009

Passover with Lori Lynn


Lori Lynn from Taste with the Eyes who is once again hosting the Passover Roundup is well known for her love of both family and tradition.

In our last post, we wrote about the tradition of making gefilte fish for this occasion. Here it is being served at our Passover Seder.


One of the reasons for our maintaining a blog is to keep a colour commentary and share family recipes that have been passed down through generations. Although not a direct contributor to the blog, a good number of our recipes are either directly received from babba, the matriarch of our family or an offshoot of many of her recipes.


After all the formalities are done, we settled in to play a crazy game of Apples to Apples that kept everyone laughing for the rest of the evening.


To all our blogging friends who celebrate Easter, our wishes for a meaningful holiday season filled with family, friends and good food.

Tuesday, April 7, 2009

Gefilte Fish for Passover

One of the best known of Jewish holidays beginning at sundown on April 8th is Passover. Our familiarity with Passover (or Pesach - pronounced pe-sach with a Scottish rolled ch) ties in with Christian history. The Passover in Christianity is depicted by The Last Supper.

One of the traditions of Pesach is the making of Gefilte fish which, admittedly is an acquired taste. I can remember the age long debate of whose gefilte fish is the best. The Jews from Poland made a sweeter tasting fish while the Jews from Russia made a more savory tasting fish. It's all what you grew up with. Everyone seems to guard their family recipe and claims that theirs is absolutely the best.

Gefilte fish is a ground fish recipe, popular with people of Ashkenazi Jewish heritage(eastern European heritage). Formally, it is a type of quenelle, a delicately flavored patty made of lightly seasoned ground fish or white meat. Similar dishes exist in many cultures in local recipes bland or spicy, served plain or sauced, and cooked in simple broth or as part of an elaborate fish stew.

Here's babba's recipe that's been kept under lock and key. We think it's "the best".


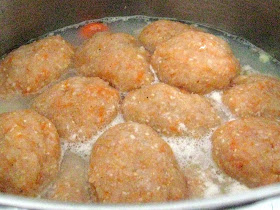
Since these are still cooling, you'll have to wait for the next post to see the plated version.

Ingredients

5 lb. pickerel fillets (you could use a combination of carp, pickerel and white fish)
2 large onions (divided
4 large carrots (divided)
1 parsnip
4 eggs (rule of thumb is 1 egg per pound of fish if the fish is filleted skin off)
1/2 cup grated ground almonds (divided)
4 handfuls of matzoh meal (approximately 1 cup)
1 Tbsp Salt
1/2 tsp pepper
1/2 cup sugar
6 cups water

Method

1. In a large stock pot slice 1 large onion and 2 carrots, salt,1/4 c sugar, 6 cups water.

2. Peel 2nd onion and cut roughly to fit meat grinder.


This meat grinder came to Canada with babba 50 years ago.

3. Remove skin from fillets (it's easier to ask the fish monger to do this)

4. Process carrot and parsnip on fine grater or grate with a box grater.

5. Put cleaned fish fillets and 2nd onion through meat grinder.

6. Add carrots, parsnip and onion to fish.


7. Add salt, pepper, eggs and 1/2 c sugar


8. Mix ingredients together - should be loose but hold together. If it feels too loose, add a little matzoh meal to the mix. At this point you may either form your patties or refrigerate the mix for 30 minutes to let it set.
9. With wet hands, create patties by gently rolling in a circular motion and shape like an egg.

10. Start pot to heat as you're shaping and layering your patties. Very gently lower them into the pot. Be sure not to disturb them until they're cooked and cooled.

11. A second layer is added over top the first layer.
12. Bring to a boil and turn down to a simmer, lid on for approximately 2 hours. After the first hour, sprinkle the remaining ground almonds to the pot.
13. To cool, put pot into a sink of cold water - about 1/2 way up the pot.
14. Once the fish is completely cooled, move to a serving platter and refrigerate until time to serve.
15. Serve with red horseradish.

Yield on 5 lb. of fish is 24 patties.

To those celebrating Passover - Chag Sameach!!