Pages

Wednesday, December 28, 2011

Holiday Memories

This year's holiday celebration was one of the most memorable on record. The only thing that creates a hold back on perfection is that Psychgrad and "R" were out west with "R"'s family. We were a collection of family and friends who shared the non commercial joys of the season.

We were at my brother's home and I love that he's a foodie and also pays attention to detail.


We decided to not go with the traditional North American dinner and opted to have a cultural celebration. Everyone had a contribution to bring so you could say it was a pot luck dinner.

I was excited to learn about traditional Venezuelan Christmas foods. The first is call Pan de Jamon, a ham, raisin and olive bread. A sweet, soft dough is rolled up around savory ham, sweet raisins and pimento-stuffed olives.


The dough is deliciate and soft and the filling, as unusual as it sounded to me initially just works. The Pan de Jamon is something that I'll definitely try. I was lucky enough to have it made for us by our friend Carlos of Empanada fame. Not only is he a great cook, he also shares his knowledge enthusiastically.


If you're in the Toronto area you could also do this the easy way and give Jose of Pimenton a call.

Jose is also known in our circle for his boozy gluten free Christmas cakes, great food and fun cooking classes.

My next fascination is with the Christmas Hallacas, kind of a tamale; served either as an appetizer or a main dish. To say tamale really minimizes the effort it takes to make this dish. Some make it at family gathering that takes a full day with all involved or for Carlos who didn't have alot of help, it was a 4 day ordeal. A Masa corn dough filled with a stew and wrapped in either corn husks or banana leaves, the finale is in placing them in a pot of boiling water for an hour to marry all the flavours together.


and of course a vegetarian one for "A"


I've included a recipe in the links below. I suspect that each region has it's own version with variations in the spice mixture. The one thing that's for sure, the hallaca is a labour of pure love and I savoured every mouthful.

There was a fully stuffed Tofurkey complete with vegetarian gravy. I had no idea vegetarian gravy could be so good.


For the poultry lovers, we had Chicken Scallopini stuffed with Fontina Cheese (one of Giada's recipes - see below)


and a Quinoa Everything Salad


Of course, by this time you're on overload already but somehow just have to find a little more room for desserts.


We generally finish off with a round of table musicians - oops...we forgot all about it.


Suki was on guard through the whole thing just to make sure that if anything dropped, it didn't hit the floor.


Disclaimer: I just couldn't include EVERYTHING - this post would have been 3 days long :)

Links:
Pan de Jamon
Chicken Scallopini

Thursday, December 22, 2011

Vegetarian Tourtiere

The family and friends are getting together this weekend for the BIG celebration. Our family is both multi ethnic with a variety of religious affiliations. As my SIL "R" says, we celebrate Chrismakkah in a non denominational way. Everybody brings a little bit of where they come from and who they are to the table and it's a wonderful celebration. That's not to say that it's stress free. Hell no!

Our newest member of the family as I've mentioned before, is a vegetarian so it's always a challenge for me to create something that's vegetarian worthy while still being tasty. Since I'm not a vegetarian it presents a greater challenge for me only because it's unfamiliar. This year, I made traditional French Canadian tourtieres but also wanted our veggie being to have some too. I found a recipe for vegetarian tourtieres on Canadian Living . So happy!!!! I was particularly happy since our vegetarian is from Venezuela and having something so distinctly Canadian was important for me.

It took the better part of a day (start to finish) to create the tourtiere. I also decided to go with a vegetable shortening premade pie crust (although I'm listing Canadian Living's recipe for the crust). Everything went amazingly UNTIL I took the tourtiere out of the oven. I won't repeat what came out of my mouth - I'll just show you. Don't you just hate when this happens?


I couldn't believe it. I should have put a pan underneath it prior to putting it in the oven. I didn't. I will next time. The filling, by the way, is really and truly tasty and inspite of the crack I'm sure it'll be well received for the effort.

Ingredients

2 cups (500 mL) TVP* (Textured Vegetable Protein)
2 tbsp (30 mL) vegetable oil
3 ribs celery, (with leaves)diced
2 onions, diced
2 cloves garlic, minced
2 cups (500 mL) cubed peeled potatoes
2 tsp (10 mL) tamari or sodium-reduced soy sauce
1-1/2 tsp (7 mL) dried savory
1/2 tsp (2 mL) salt
1/2 tsp (2 mL) pepper
1/4 tsp (1 mL) ground allspice
1/4 tsp (1 mL) ground cloves
2 bay leaves
2 cups (500 mL) vegetable broth


Pepper Thyme Pastry
:

3 cups (750 mL) all-purpose flour
1 tsp (5 mL) salt
1 tsp (5 mL) dried thyme
1/2 tsp (2 mL) cracked black peppercorns
1/2 cup (125 mL) unsalted butter
1/2 cup (125 mL) shortening
2 tsp (10 mL) vinegar
2/3 cup (150 mL) Ice water

Pepper Thyme Pastry: In bowl, whisk together flour, salt, thyme and pepper. Using pastry blender or 2 knives, cut in butter and shortening until in fine crumbs with a few larger pieces. In liquid measure, whisk vinegar with enough ice water to make 2/3 cup (150 mL). Drizzle over flour mixture, tossing with fork to form ragged dough.

Divide in half; press into 2 discs. Wrap each and refrigerate until chilled, about 30 minutes. (Make-ahead: Refrigerate for up to 24 hours.)

In large bowl, pour 1 cup (250 mL) boiling water over TVP; cover and let stand for 10 minutes.

Meanwhile, in shallow Dutch oven, heat oil over medium-high heat; cook celery, onions and garlic, stirring occasionally, until golden, about 10 minutes.

Stir in potatoes, tamari, savory, salt, pepper, allspice, cloves, bay leaves and TVP; cook, stirring often, for 5 minutes.

Stir in broth and 1 cup (250 mL) water; bring to boil. Reduce heat, cover and simmer until potatoes are tender, 30 to 40 minutes.

Break up most of the potatoes with back of spoon; simmer, uncovered, until slightly thickened, 7 to 10 minutes. Let cool. (Make-ahead: Refrigerate in airtight container for up to 24 hours.)

On lightly floured surface, roll out 1 of the pastry discs to generous 1/8-inch (3 mm) thickness. Fit into 9-inch (23 cm) pie plate. Trim to rim of plate. Spoon in filling.

Roll out remaining pastry. Brush rim with water. Place pastry over filling; trim to leave 3/4-inch (2 cm) overhang. Fold overhang under pastry rim; flute to seal.

Roll out pastry scraps; cut out holiday shapes. Brush top of pie with water; arrange cutouts on top. Cut steam vents in top. Bake in bottom third of 400°F (200°C) oven until bubbly and golden, about 1 hour.


Links:

** More about TVP
Arguments for and against the use of TVP

Tuesday, December 20, 2011

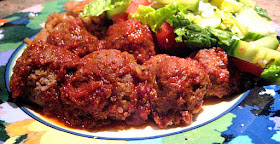
Tangy Meatballs

I'm quickly running out of time and still have so many posts in waiting. I'm clearly not going to get everything up on time. If you're looking for a quick, really easy, tangy dish to take to your celebration (or even if you're having guests over), this is it.


3 lb lean ground beef (veal, chicken or turkey would work too)
1/2 cup corn flake crumbs
2 eggs
3 Tbsp soy sauce
1/2 cup ketchup
3 Tbsp onion powder

Sauce

1- 14oz can jellied cranberry sauce
1- 10 oz jar chili sauce
2 Tbsp brown sugar
1 Tbsp lemon juice


1. Combine beef, corn flake crumbs, eggs, soy sauce, ketchup and onion powder. Roll into meatballs and place on a foil lined cookie pan. Bake at 350 F for 25 minutes.
2. In a medium saucepan, combine cranberry jelly, chili sauce, brown sugar and lemon juice.
3. In a dutch oven, combine meatballs and sauce and cook on medium low for approximately 20 minutes.

Enjoy!

I call these my grown up meatballs. So delicious and they freeze really well.

Monday, December 19, 2011

Quinoa for Lunch

This is the kind of week that has just about every minute accounted for. We still want to eat things that are nutritious and for me quinoa is a magic food that's both really satisfying as well as healthy. I don't think I've met a quinoa dish I didn't like and this one is no exception. The combination of squash, mushrooms and onions is amazing.


1 cup Quinoa
2 cups water
2 cups butternut squash, cubed
1 large onion, sliced
2 cups mushrooms (I used cremini), sliced
3 Tbsp olive oil
salt and pepper to taste

1. In a medium pot cook the quinoa with the water for approximately 12 minutes, lid on (water should be absorbed). Let stand with heat off for a few minutes and then fluff with a fork. Set aside to cool.
2. Roast the butternut squash in a 350 F oven until tender - approximately 20 minutes. You can fry it if you prefer but roasting brings out the beautiful flavour of the squash.
3. Fry onion and mushroooms in the olive oil until the onions are carmelized.
4. Combine everything with the quinoa including any leftover olive oil in the pan. Salt and pepper to taste.

Friday, December 16, 2011

President's Choice Holidays and Tips 2011

Here we are on the biggest shopping weekend before the holidays and you're probably thinking that you don't need any reminders; that you're already stressed to the max and still have a gazillion things left to do.

In addition to some last minute things you may need, did you know that President's Choice also has a wealth of tips and how to videos to help you get through the season. Are you making a turkey for the first time or haven't had total success with ones you've made in the past? Spend a couple of minutes with Chef Tom PC - Videos who will help you perfect your turkey skills.

I have family coming to celebrate this weekend and one of the plates I'll serve is a cheese platter. I always feel a little challenged in deciding what goes with what and how to create a beautiful looking platter. Want some tips? How to create a great cheese platter or plate - PC -helps take the uncertainty out of preparation.

The focus on great desserts is one that everyone looks forward to. Personally, I've been making some of my own regular desserts but I'm also picking up a few others that will make my life so much easier.


One of our group loves molten lava cakes. I made them last year - a total and dismal failure. I'm not letting that happen again.


The kids will be so happy. Between the ice cream and whoopie pies, it'll be a memorable time for them too. I'll be in the running for "cool aunt" award. I'll give them their grape juice in wine glasses too.


After each group gathering there's always the one dreaded event none of us is excited about; the dreaded clean up. Of course you know that PC is going to have some tips about this too. Check out the Clever ideas for your post-holiday clean up - PC -

Wednesday, December 14, 2011

Magic in the Middle Cookies

I know - I'm on a blogging marathon these days. I'm so far behind and so many good things to share before the holidays hit us. This Magic in the Middle Cookie from King Arthur Flour is one of the "must do" cookies for the holidays. Although it's probably been around forever, it's a new addition to my cookie list for this year.


CHOCOLATE DOUGH

1 1/2 cups King Arthur Unbleached All-Purpose Flour
1/2 cup cocoa powder, unsweetened baking cocoa or Dutch-process cocoa
1/2 teaspoon baking soda
1/4 teaspoon salt
1/2 cup granulated sugar (plus extra for dredging)
1/2 cup brown sugar
1/2 cup (1 stick) unsalted butter, softened
1/4 cup smooth peanut butter
1 teaspoon vanilla extract
1 large egg

PEANUT BUTTER FILLING

3/4 cup peanut butter, crunchy or smooth, your choice
3/4 cup confectioners' sugar

Directions

1. Preheat the oven to 375°F. Lightly grease (or line with parchment) two baking sheets.
2. To make the dough: In a medium-sized bowl, whisk together the flour, cocoa, baking soda and salt.
3. In another medium-sized mixing bowl, beat together the sugars, butter, and peanut butter until light and fluffy. Add the vanilla and the egg, beating to combine, then
4. stir in the dry ingredients, blending well.
5. To make the filling: In a small bowl, stir together the peanut butter and confectioners̢۪ sugar until smooth.
6. With floured hands or a teaspoon scoop, roll the filling into 26 one-inch balls.
7. To shape the cookies: Scoop 1 tablespoon of the dough (a lump about the size of a walnut), make an indentation in the center with your finger and place one of the peanut butter balls into the indentation.
8. Bring the cookie dough up and over the filling, pressing the edges together cover the center;
9. roll the cookie in the palms of your hand to smooth it out. Repeat with the remaining dough and filling.
10. Roll each rounded cookie in granulated sugar, and place on the prepared baking sheets, leaving about 2 inches between cookies.
11. Grease the bottom of a drinking glass, and use it to flatten each cookie to about 1/2-inch thick.
12. Bake the cookies for 7 to 9 minutes, or until they're set and you can smell chocolate. Remove them from the oven, and cool on a rack.


Tips from the King Arthur Flour Bakers:

The most reliable way to make sure you have equal amounts of filling and chocolate dough is to use a cookie scoop. Our teaspoon scoop yields exactly 26 fillings when scooped with the dough level across the top. Our tablespoon scoop when filled level will yield exactly 26 chocolate blobs of dough to match.
If you're doubling this recipe, add an extra egg to the chocolate dough.
If you're making this dough ahead of time, add an 2 tablespoons of milk to the chocolate dough. It tends to dry out as it sits, and the extra moisture will keep the outside dough from cracking as you form the cookies.

Tuesday, December 13, 2011

Oven Roasted BBQ Chicken

I've been following Chicken Farmers of Canada on Twitter for awhile now (@chickenfarmers). Chicken Farmers of Canada is an organization that works with our 800 chicken farmers making sure there is a steady supply of safe chicken to the Canadian consumer market. Their website is a great visiting spot for me to check out chicken recipes, sauces, rubs and tips, especially from new chef partner Chef Rob Rainford. Not only is Chef Rob an accomplished chef and cookbook author, he's pretty easy on the eyes too. (did I really just say that?) Val from More Than Burnt Toast had an interesting post about Rob Rainford worth reading.


I found an interesting recipe for BBQ Chicken Rub on the website and had to try it out. I had a couple of small packages of chicken pieces, felt inspired and that was all it took.

BARBECUE CHICKEN RUB

1/4 cup brown sugar, packed 60 mL
2 Tbsp chili powder 30 mL
2 Tbsp paprika 30 mL
1 Tbsp cumin, ground 15 mL
1 tsp cayenne pepper 5 mL
1 Tbsp garlic powder 15 mL
1 Tbsp mustard powder 15 mL
2 tsp salt 10 mL
1 tsp pepper 5 mL

Mix all ingredients


Store in an airtight container until needed
Coat chicken generously with rub and roast or grill

Tip: Dispose of unused rub that comes in contact with the raw chicken.


I coated the chicken with the rub, put it in the oven at 350 F for 35-40 minutes (depending on how hot your oven is) and that was it. Pretty darned easy and within seconds the rub was giving off an aroma from heaven. I can really remember hearing myself have a Martha moment and saying "this is a good thing."

Sunday, December 11, 2011

Ina's Daisy Shortbread Cookies

Two of the staples for me each holiday season are the fruit cakes and the shortbread cookies. I always do these first since the curing process makes both better with time. I generally make the food processor variety. We all love them; easy to make and so melt in your mouth. This year, I wanted to add a variety that's more firm so I started my search online for the best rated cookies. It was no surprise to me that Ina Garten's Daisy Shortbread Cookies had such great reviews. It's hard not to love everything that comes out of her kitchen.


Makes 24 cookies

Ingredients

3/4 pound unsalted butter, at room temperature
1 cup granulated sugar
1 teaspoon pure vanilla extract
3 1/2 cups all-purpose flour
1/4 teaspoon kosher salt
3/4 pound confectioners' sugar
Yellow white chocolate buttons, for decoration
Directions
Preheat the oven to 350 degrees F.

In the bowl of an electric mixer fitted with a paddle attachment, mix together the butter and granulated sugar until they are just combined and add the vanilla. In a medium bowl, sift together the flour and salt, then add them to the butter-and-sugar mixture. Mix on low speed until the dough starts to come together. Dump onto a surface dusted with flour and shape into a flat disk. Wrap in plastic and chill for 30 minutes.

Roll the dough 1/4-inch thick and cut into flower shapes with a cutter. Place the cookies on an ungreased baking sheet.

Bake for 20 to 25 minutes, until the edges begin to brown. Allow to cool to room temperature.

For the glaze, place the confectioners' sugar in a medium bowl and add about 4 to 5 tablespoons of water until you have a runny, but not too thick frosting. Spread the glaze to the edge of each cookie and garnish the middle of each cookie with a chocolate button.

I didn't include the glaze or finishing touches but frankly, I found these cookies to be fantastic the way they come out of the oven.

Tip: Don't roll the dough too thin or your cookies will brown too quickly.

Thursday, December 8, 2011

Butternut Squash Gnocchi

Remember when Giz lost her mind and bought way too many pumpkins?   I know that's vague seeing as losing her mind and buying too much food is a bit of a regular occurrence.  Well, one of the side effects of this was me having frozen pumpkin puree in my freezer for about a year.  Maybe that makes me an enabler.

I figured, it would probably be 'pushing it' to keep the puree in the freezer for more than a year.  Around the same time, I saw this really great post and video about making pumpkin gnocchi.  The inspiration began...  Then, Proud Italian Cook featured a gnocchi-making day on her blog.  I would love to be able to take part in one of her mass pasta-making days.  I e-mailed Marie, asking for her recipe.  Turns out she got about 200 other similar e-mail requests.


Butternut Squash Gnocchi 


Ingredients

  • 2 cups of  pureed butternut squash (I used pumpkin)
  • ½ cup Parmesan cheese
  • 1 tsp. salt
  • Pepper to taste
  • 2 eggs
  • 2+ cups flour

Instructions

Preheat the oven to 375 degrees. Cut the squash in half. Remove the seeds, drizzle with olive oil, salt and pepper. Lay cut side down on parchment lined baking sheet. Roast the squash until soft—30 minutes or so.

Scoop the flesh of the squash out and place it in the food processor. Puree until completely smooth.
**I started at this point in the recipe, since I already had the pureed pumpkin.  However, I figured I should remove the water from the puree.   I put the puree in cheese cloth and let the water drain for about an hour (and then squeezed it impatiently).  

What originally started out at about 4 cups, turned into about 2 cups, after the water was removed.


Mix the pureed squash with parmesan cheese, salt, pepper and eggs. 


Then add the flour into the mixture and work together by hand (I started with a spoon and then switched to using my hands).


It will be very sticky.  I ended up needing well over 2 cups (probably closer to 2 and 3/4 or 3 cups) by the time I was done.


Once smooth, flour work surface, Divide dough into 6 pieces.


Roll each piece into a long strip, about ½ inch wide. Cut the strip into ¼ to ½ inch pieces.


Using a gnocchi board, a fork, the back of a grater (or just as is) to create ridges. 


Place each piece on the floured wax paper and repeat with the rest of the dough.

Bring a large pot of salted water to boil. Boil until all the gnocchi floats—about 5 minutes.


While gnocchi is cooking have your sauce ready so you can toss right in.  


If not you can freeze them.


The recipe made enough for 3 sheets worth of gnocchi.  I actually froze them all, but defrosted one sheet the next day for dinner.


The rest went into a freezer bag for leftovers.


Verdict: A very good first effort, if I do say so myself.  My gnocchi may not be as pretty as Marie's, but I really liked the taste. I didn't really taste the pumpkin flavour, but that's probably my fault for pairing it with a tomato sauce.  I would definitely make this (or one of Marie's other gnocchi recipes) again -- probably a double or triple recipe. 


It has been a really long time since I've made a pasta dish worth blogging about. So, I've got to share this with Presto Pasta Night.  This week's (week #243) roundup is being hosted by Jamie at Cooking with Moxie.