Pages

Monday, May 28, 2012

The Neverending Lawn Saga

I love the anticipation (and appearance) of fresh fruits and vegetables that comes with this time of year. But having a whole other part of the house to take care of (the yard) sure adds to the chore list.  It wouldn't normally mind, but my yard has been a major thorn in my side.   Let me show you why... Advice is welcome!

The Province of Ontario banned the use of many pesticides about three years ago. In theory, I like the idea of not putting chemicals on my lawn or having to endure neighbour's chemicals. In practice, it makes lawn maintenance more challenging.

Here's my lawn shortly after the snow melted (some time in March):


By "lawn", I mean, weed graveyard.

Ugh.

I don't know what happened -- it was fine in July of last year:


Either we killed it with a lack of water...or the city's arch nemesis, grubs, got to our lawn. Grubs have been a growing problem around here since our winters aren't really cold enough to kill them off and nematodes (the non-chemical solution to grubs) requires a lot of water to be effective and are still not 100% effective when applied correctly. All you have to do is walk around various neighbourhoods in Ottawa and you'll see large patches of lawn missing or in various states of (dis)repair.

In around April of this year, here's what our weeded lawn looked like:


Not exactly the perfect spot for a picnic.  So depressing!

I asked around (local nurseries, Master Gardener's of Ottawa, neighbours, etc.) and got advice ranging from adding 2 inches of top soil and reseeding to resodding.

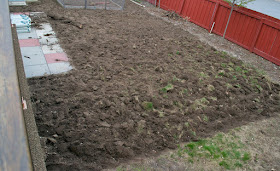
In the end, we decided to till the entire yard, add some compost, roll and reseed.  Kudos goes to R for doing all of the work.


See that pile of sticks in the corner?  Those are roots coming out of the ground.  There must have been a tree planted in our yard at some point.


See that crazy branch in the picture below?  Also, dug out of the ground...


Here it is up close:


Dealing with the portions of the lawn with existing grass was actually the most difficult since we wanted to level the soil.


After tilling the lawn, R spread compost lightly throughout:


After getting rid of the remaining grass, raking the lawn flat and spreading compost, we rented a lawn roller from Home Depot.


Hoping to be proactive, we opted to seed with a fescues mix.  Fescues is a variety of grass seed that tends to be more drought resistant and less attractive to grubs.  The trouble with fescues it that it germinates more slowly and seems to take longer to create an established lawn.  We went with Eco-Lawn


After about three weeks of watering regularly (early in the morning, if there wasn't any rain forecasted for the day), here's what our lawn looked like:


I wish I had a great after-picture to share with you...but it's still a work in progress.  It's looking greener, but a lot of what's there is weeds.  FML! 

I think it's going to be a multi-year project to get our lawn back.  Worst comes to worst, we'll just give up and re-sod (R also likes the option of paving it...but I don't see that happening).  But, I took the above picture into Green Thumb Nursery, where we bought the seed, asking whether it looks okay and she said it looks normal and to just keep watering.  


The clover is particularly aggressive:


R's new plan is to weed daily, add more seed and water twice a day. 

On the bright side, the garden is planted.  


The soil looks a bit strange at the moment, after the torrential rain we had yesterday...But I think all of the plants are in tact.  We planted 4 tomato varieties, cucumbers, 3 lettuces and 4 herbs.  I'm aiming for something low maintenance because I don't think we'll have much time for gardening later on in the summer.


R even suited up in his "impenetrable superhero suit" to remove a couple of wasp's nests that we found.  

Friday, May 25, 2012

Tortilla and Black Bean Pie

I'm holding Giz captive in Ottawa.  We are hard at work shopping for baby essentials and filling up my freezer.  I'll try to update you on both at some point in the near future.  Here's a post I wrote up a while ago, didn't save properly (I'm blaming the new blogger on that one) and just got time to finish it off:

_____________________________________________________________

What was that no-so subtle hint,  mom?  You want me to blog?

The thing is that I haven't felt like trying new recipes lately.  Between making stuff from our usual repertoire and eating cereal, I've been quite content. R, he's more adventurous.  Give him a few days in Montreal and he'll come home with random photos of poutine with everything (except for the kitchen sink) on top.


Let me share one of R's more recent concoctions.

He initiated this from start to finish...between asking my mom for recipe recommendations, making sure we had the ingredients, making the food, taking pictures (including the obligatory crotch shot...don't ask why - it's just a thing he does when taking pictures that he knows I'll put up on the blog), and eating it all up.


This recipe comes from Martha Stewart.

Tortilla and Black Bean Pie

            4 flour tortillas (10 inches)
            2 tablespoons canola oil
            1 large onion, diced
            1 jalapeno chile, minced (remove seeds and ribs for less heat)
            2 garlic cloves, minced
            1/2 teaspoon ground cumin
            Coarse salt and freshly ground pepper
            2 cans (15 ounces each) black beans, drained and rinsed
            12 ounces beer, or 1 1/2 cups water
            1 package (10 ounces) frozen corn
            4 scallions, thinly sliced, plus more for garnish
            8 ounces cheddar cheese, shredded (2 1/2 cups)
Directions
Preheat oven to 400 degrees. With a paring knife, trim tortillas to fit a 9-inch springform pan. Use the bottom of the pan as a guide. Set aside.
Heat oil in a large skillet over medium heat. Add onion, jalapeno, garlic, and cumin; season with salt and pepper. Cook, stirring occasionally, until softened, 5 to 7 minutes.
 Add beans and beer, and bring to a boil. 
Reduce heat to medium; simmer until liquid has almost evaporated, 8 to 10 minutes. 
Stir in corn and scallions, and remove from heat. Taste and adjust for seasoning.

Fit a trimmed tortilla in bottom of springform pan; layer with 1/4 of the beans 

and 1/2 cup of cheese. 
Repeat three times, using 1 cup cheese on top layer. 
Bake until cheese melts, 20 to 25 minutes. Remove side of pan; sprinkle pie with scallions. To serve, slice into wedges.


According to R, this recipe is a winner and he would make it again.


Thursday, May 17, 2012

Chicken Enchilladas

Since I've discovered the flavours of Mexico I've become a little crazy about trying everything I can.  What have I been doing all my life without having such wonderful combinations in my menu planning.  You also have heard me talk about my newest addiction to Pinterest.  It's really quite addictive finding new recipes and great ideas.  I'd seen enchilladas everywhere and .... well... the rest is just history.

I made sure I had the right ingredients in the house and decided it was time to give this one a whirl.  While taking out the ingredients, I got distracted and put away the enchillada sauce.  Have you seen it?  No?  Neither have I.  I'm sure I put it somewhere but honestly, I can't find it anywhere.  One of these days it'll turn up in a cupboard or freezer somewhere.  So, what to do?  I had a jar of President's Choice Corn and Black Bean Salsa - Mild and decided that this would be the new version of enchillada sauce.  


Ingredients:

2 skinless boneless chicken breasts
1 bottle White Corn and Black Bean salsa
1/2 cup chicken broth or water
8 oz. combination of cheddar and monterey jack cheese
jalapenos for more heat, garnish or not
8 large whole wheat  tortillas

How to:
Preheat oven to 450 F.
Spray a 9x13 pan with non stick
In a deep skillet pour in the salsa and water.  Cook the breasts in the salsa for about 20 minutes at medium.
Shred the chicken and divide to the 8 tortillas.  Top with a little cheese on each one and roll up. 
Put half of the salsa on the bottom of your 9x13 and add your enchilladas seam side down in your pan.
Top with remaining sauce and sprinkle cheese over the top.


Bake uncovered for 15-20 minutes (depending on how brown you like your cheese)


I'm really such a novice when it comes to this cuisine but this was so easy and so flavourful. I'll definitely be making this one again and again.

Monday, May 14, 2012

Black Bean Salad with Corn, Red Peppers, Avocado and Lime-Cilantro Vinaigrette

Mothers, did you enjoy your special day?  I know I did.  We had a great family day although we missed not having Psychgrad and "R" with us.  Too bad since this is the first time we can actually wish her an "almost Happy Mother's Day".    Speaking of Psychgrad, has anyone besides me been missing her smiling face around here?   Junior is not making an appearance until mid summer and I know she's feeling great.  How's that for subtle?

Have you seen this  Black Bean Salad around the internet these days?  It's such an incredible salad that's easy to make.  When I first saw it on Pinterest I thought it looked so colourful and provided a great healthy option to the regular salads we make.  I made a double recipe and took it with me to our Mother's Day event.  No leftovers, not even a single bean.

Don't hesitate to take this salad with you to a cookout.  It's impressive.

Servings: 6-8


Ingredients
  • 2 15-ounce cans black beans, rinsed and drained
  • 3 ears fresh cooked corn, kernels cut off the cob
  • 2 red bell peppers, diced
  • 2 cloves garlic, minced
  • 2 tablespoons minced shallots, from one medium shallot
  • 2 teaspoons salt
  • 1/4 teaspoon cayenne pepper
  • 2 tablespoons sugar
  • 9 tablespoons extra virgin olive oil, best quality such as Colavita
  • 6 tablespoons fresh lime juice (be sure to zest limes before juicing them)
  • 1/2 cup chopped fresh cilantro, plus more for garnish
  • 2 Hass avocados, chopped

Instructions

  1. Combine all ingredients except for avocados in a large bowl and mix well. Cover and chill for a few hours or overnight. Right before serving, add avocados and mix gently, being careful not to mash avocados. Garnish with a more chopped cilantro if desired. Serve at room temperature.

Thursday, May 10, 2012

Breakfast Egg Muffins


How many times have you heard people tell you that breakfast is the most important meal of the day?  Until a few years ago breakfast for me was coffee - not smart.  Now I make a point of getting my metabolism in full gear within an hour of waking up.

I'm also a President's Choice kinda gal.  Anything I want I generally can find there.  Don't get me wrong - I don't agree with everything PC does.  I wish they'd stop selling garlic from China but I guess I have the choice of just not buying it there.   Our local garlic is so much better and also supports our local farmers.  The interesting products I find far out weigh the one or two differences of opinion that we have.

Now that Psychgrad is expecting, I've been working on recipes that are nutritious and can be frozen so that she and "R" can have readily available good quality meals ready during the sleep deprivation stage.  I mean, who really thinks about cooking and nutrition when all you want to do is sleep?

Today I made breakfast cups that are full of goodness, can easily be frozen and reheat well.

Ingredients

9 eggs
6 strips turkey bacon, fried and diced small
1/2 cup 1% milk
1 pepper, diced (I used an orange one)
6 leaves of  basil, cut very small
1/4 cup minced scallions
1/2 cup PC tex mex cheese

Preheat oven to 350 F

Spray a tray (6) of extra large muffin cups with non stick spray (or 12 small muffin cups)
Mix all the ingredients together except for the cheese
Fill the muffin cups to 1/2 inh of the top and spread a little cheese on each one

Bake for approximately 20 minutes or until tops turn a golden brown.
Wait a couple of minutes before you take the muffins out of the tins, using a knife to loosen the sides.
Yumalicious and you don't need carbs to go with it.

Tuesday, May 8, 2012

Baked Quinoa and Chicken Parmesan

The weather has been iffy lately. One day it's gorgeous and the next it's grey, rainy and dreary. Today is one of those dreary days that gets me thinking about comfort food. The craving for comfort food is always dangerous especially since I'm really trying to maintain a healthy diet and not over indulge on fat laden foods.

Chicken Parmesan is one of my favourites. How do I get all the flavour without all the fat? I was completely and pleasantly surprised to find something that would fill the bill, give me the comfort and not load me up with fat. Baked Quinoa and Chicken Parmesan from a dietician with an eye for trimming costs.  A serving of 1 1/2 cups per person converts to an approximate cost of $1.90/per person.  Makes a pretty good argument for eating at home.

Preheat the oven to 375.


Ingredients
1 Tbsp olive oil
1 medium onion, diced
3 cloves garlic, minced
2 Tbsp balsamic vinegar
1 (15 oz) can tomato sauce
1 (15 oz) can no salt added diced tomatoes
1/4 tsp red pepper flakes basil and oregano, to taste (I used about 1/4 cup total)
1 cup quinoa, uncooked
2 cups water
1 lb boneless, skinless chicken breasts
1 cup (4 oz) fresh mozzarella cheese, shredded and divided
1 oz parmigiano-reggiano or pecorino romano, shredded
2 Tbsp breadcrumbs (optional, exclude to make gluten-free)


Directions:
Fill a pan with 1-1 1/2 inches water. Season with a pinch of salt. Bring to a boil and add chicken. Cover and allow to simmer for 5-6 minutes.
Flip over the chicken and cook an additional 5-6 minutes. Remove from water and chop into bite-sized pieces.

Spray a large baking dish with olive oil spray.
To make the sauce, heat a large skillet over medium heat, and add the oil. Stir in the onion and cook, stirring frequently, until tender, 5-7 minutes.
Add the garlic and cook until fragrant, 30-60 seconds.
Add the balsamic vinegar, scraping anything off the bottom of the pan, and cook until it’s almost fully absorbed.
Add the tomato sauce, diced tomatoes, red pepper flakes, basil, oregano, and pepper to taste. Bring to a low boil, and then simmer while you prepare the rest of the meal.

Place the quinoa in a mesh strainer, and rinse with cold water for about 1-2 minutes. Add the quinoa and water (and a dash of salt) to a sauce pan and bring to a boil. Cover with a lid, reduce the heat, and simmer until cooked, about 20-25 minutes.

In a large bowl, combine the cooked quinoa and chicken with the sauce and mix thoroughly.
Place half the mixture in the baking dish, and sprinkle with 1/2 cup of the mozzarella cheese.
Top with the remaining quinoa mixture. Sprinkle with the remaining mozzarella cheese, and the parmigiano/pecorino.
Add the breadcrumbs. Cover with foil and bake for about 15 minutes. Remove foil and continue to bake until cheese is lightly browned and bubbly, about 10 more minutes.

Yield: 6 servings (about 1 1/3 cups each)
I know it's not beautiful to look at but the flavour is definitely there and the comfort is guilt free.

Friday, May 4, 2012

Strawberry Muffins


My wanderings on Pinterest brought me over to a new to me blogger who goes by the name of  No Fear Entertaining.  She talked about strawberry muffins and how good they were and of course I needed no further prompting.  She described them as good, very very good and I totally agree with her.  They're moist and light and so welcome with a cup of tea.

preheat oven to 375°


Ingredients
  • 1-3/4 cups all-purpose flour
  • 3/4 cup sugar
  • 1 teaspoon baking soda
  • 1/4 teaspoon ground nutmeg
  • 2 eggs, lightly beaten
  • 1/2 cup fat-free plain yogurt  (I used Greek yogurt)
  • 1/4 cup butter, melted and cooled
  • 1 teaspoon vanilla extract
  • 1-1/4 cups coarsely chopped fresh or frozen unsweetened strawberries
Directions
  • In a small bowl, combine the first four ingredients. In another bowl, whisk the eggs, yogurt, butter and vanilla. Stir into the dry ingredients just until moistened. Fold in strawberries.
  • Fill muffin cups coated with cooking spray or lined with paper liners two-thirds full. Bake for 15-18 minutes or until a toothpick inserted near the center comes out clean. Cool for 5 minutes before removing from pan to a wire rack. Serve warm. Yield: 1 dozen.

I actually doubled the recipe and made a batch of regular sized muffins and some larger muffins.  I think I like them better in the larger size (for obvious reasons).  

Wednesday, May 2, 2012

Spice Rubbed Roasted Salmon with Lemon Garlic Spinach for Mother's Day at the Cooking Light Supper Club

This month's edition of the Cooking Light Virtual Supper Club is a rather special one for me. We're doing a celebration of Mother's Day. I happen to have the very good fortune of having my mother, who is a holocaust survivor, still around, still sharp as a tack and still telling me what to do.

In some ways I could say that my mom, also known as baba, the babster or bugs baba is the original inspiration for this blog. Food was always a focal point in our home. I'm sure many can relate to this but I've always felt that for someone who went through a period of her life where food was so scarce, having it, respecting it, taking care of it and not wasting it was something my mom always imparted. To this day, she would be horrified to see us throwing food away.

We've captured so many of baba's recipes on this blog by trying to reproduce something that had no real recipe or by having her share her food stories and life in the "old country"


On this Mother's Day, I'd like to share this wonderful recipe for Spice Rubbed Roasted Salmon with Lemon Garlic Spinach


Ingredients

Salmon:
1/2 teaspoon salt
1/2 teaspoon ground cumin
1/2 teaspoon ground coriander
1/4 teaspoon paprika
1/8 teaspoon ground cinnamon
1/8 teaspoon freshly ground black pepper
1 (2 1/4-pound) skinless salmon fillet
2 cups thinly sliced onion
Cooking spray

Spinach:
1 teaspoon olive oil
2 garlic cloves, minced
2 (6-ounce) packages fresh baby spinach
1 teaspoon grated lemon rind
1/4 teaspoon salt
1 tablespoon fresh lemon juice

Remaining ingredients:
2 tablespoons chopped fresh cilantro
Lemon wedges (optional)

Preparation
Preheat oven to 400°.
To prepare salmon, combine first 6 ingredients; rub spice mixture evenly over fish.
Place onion in an 11 x 7-inch baking dish coated with cooking spray.
Place fish on top of onion; bake at 400° for 20 minutes or until fish flakes easily when tested with a fork or until desired degree of doneness.

To prepare spinach, heat oil in a large nonstick skillet over medium heat.
Add garlic to pan; cook 1 minute.
Add half of spinach; cook for 1 minute, stirring frequently.
Add remaining spinach; cook 4 minutes or until wilted, stirring frequently.
Sprinkle spinach mixture with rind and 1/4 teaspoon salt. Stir in juice; remove from heat.
Place salmon on a platter.
Arrange onions and spinach evenly around salmon. Sprinkle salmon with chopped fresh cilantro. Serve with lemon wedges, if desired.


Happy Mother's Day Mom!!  I hope your day makes you feel as special as you are to us.