Wednesday, September 26, 2012

Basement Renovations: Part II


I was just looking through my previous post about basement renovations. I had almost forgotten how ugly our basement used to be and how far we've come.  If you haven't seen that post (or want to refresh your memory), check that out and then come back to read this post.

Last I left off, we had these items to complete:


- paint the walls (including a feature wall or two)
- paint the baseboards and install new quarter-round
- switch out the light fixtures
- decorate (I'd love to put shelving around the fireplace -- not that I have any carpentry skill, mind you)
- figure out what to do for window coverings

Kudos goes to R for doing all of the painting.  A huge thank you also goes to Akheela from Create with Mom.  I was luck enough to win some Shur-line painting supplies on a giveaway she hosted (here). Photo credit also goes to Akheela.  These products definitely came in handy during painting.  Particularly the one-step extension rod that allows you to smoothly extend when you're painting higher walls.


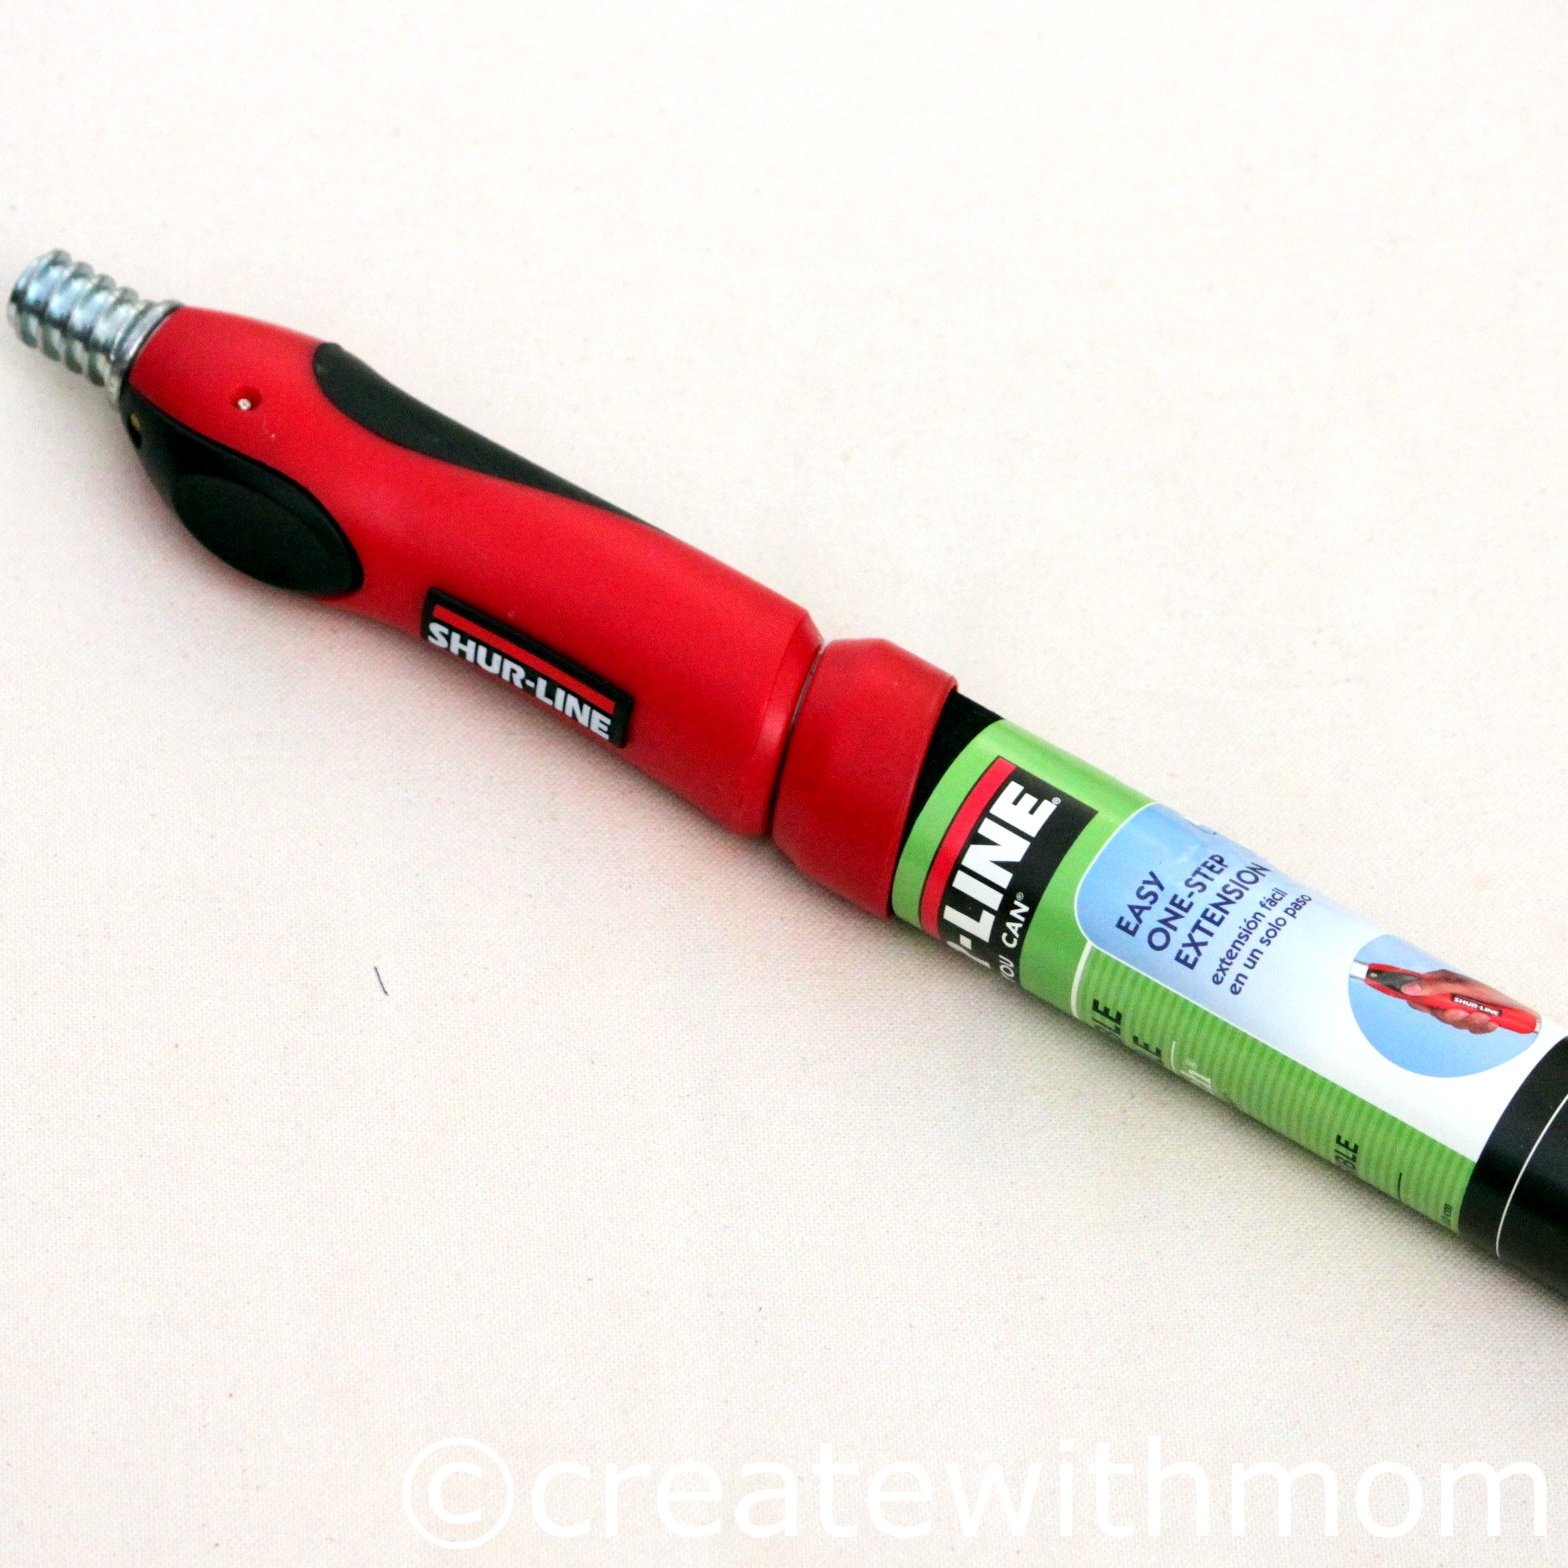
Even though all of the paint we buy is Natura brand, which has no VOCs, I was exempted from painting because of being pregnant.  So, while I was on a solo trip to Toronto, R spent the weekend painting.

Here's the feature wall.  I expected more of a green tone.  But, it came out looking like a dark chocolate brown, which I am happy with.


As you can see, we still had the quarter rounds to do.  Thankfully, our friend had a scissor-like contraption (used to make 45 degree cuts in the quarter round) and a nail gun to lend us.  So, we were able to get the quarter rounds done ourselves.  Once we got going (and visited our handy neighbour to show up how to properly load nails in the nail gun...yes we're that green), it was fairly easy.  Of course, it took us way longer than it should reasonably take a person to get the job done.  But, like most things, you forget the pain once it's over.  

We disliked the colour we originally painted the den (when we moved in about 3 years ago).  Pretty much immediately after the paint dried, we felt that it was too bright for a den.  We also used this colour in one of our bedrooms upstairs, which is currently used as an office space, and I think it works much better in there.  


I much prefer the new colour.  It looked a bit prison-cell greyish when wet.  But, it's a really nice blue-grey.  It's hard to capture the true colour in a picture, but this one is pretty close:


Next on the list....light fixtures.  We don't have overhead lighting in the main area of the basement.  I'm not sure why builders do (or did) this.  But, since we didn't plan to do any hardwiring (and I'm not crazy about the lights that were there, shown below), we decided to switch out our fixtures for some track lighting that would help to bring more light into the space.  


We picked up some simple track lights from Ikea and sold the 2 older fixtures (as shown, above) on Kijiji.  

Can I just take a moment to say how much I love Kijiji?  I've had such great experiences with the website.  In addition to selling these fixtures on there, we've purchased kitchen stools, dining room chairs and a glider on there (all in new or good quality condition).  The trick is to be patient, but check back regularly (daily or more frequently if there is a lot of activity/demand for the item).  We've also put up a few things for free on there (I was just happy to have someone pick up the items and have them be put to good use).  This resulted in an on slot of e-mails.  Of course, I'm a bit paranoid about having people come to my house (or going to theirs) for the actual exchange of money and merchandise.  So, I make sure that R always accompanies me.  

Next up is window coverings.  This was a whole learning curve for me.  I started at Fabricland.  Maybe your local Fabricland works for you, but every time I go there, I leave in a bad mood.  I feel overwhelmed by the rolls of fabric and underwhelmed by the "service."  I know I'm not alone in my experiences there.

Next we went to Rockland Textiles.  R get major props for this because there was a hockey playoff game that night.  I remember this because he reminded me several times while we were looking at fabric.  The service, in store, was good.  But the follow-through wasn't.  My fabric was supposed to arrive later in the week.  It was postponed about 5-6 times.  After a couple of months of this 
(and customer service that was tantamount to someone shrugging their shoulders as if to say, "oh well, we're not responsible for this"), I decided to just cancel my order.  

Finally we had success at C&M Textiles.  I found them to be very helpful every time we went in (about 6-8 different visits).  You get individualized customer service (someone actually helps vet the options for you) and the timing on their products is reliable.  Since I was planning to make my own curtains, they were really helpful in explaining the options and how to actually make the drapes.  

After some time researching online, I decided to go with a double pleat.  Now, I'm no sewing/curtain making expert.  But my mom did send me to sewing classes when I was about 12.  So, I have some basic recall of how to sew.  Really, the job wouldn't have gotten done with my stepmom's helps.  She's a quilter, who used to sew her own clothes.  I'm sure she didn't exactly loved spending most of her time visiting me in Ottawa cutting and pinning fabric.  But, it was all couched in the context of having a long "to do" list before the baby arrived.  

Anyway - 11 yards of fabric (plus lining) later...


Aside from being time consuming, the hardest part was figuring out the math on how thick each pleat (and space between the pleat) needed to be in order to end up with a panel that was appropriate to the width of the window.  Overall, I'm happy with how the drapes turned out.  But, I'm hoping that the pattern grows on me a bit more.  Maybe when the room is complete.

Last item on the (previous) list is to furnish/decorate.  That's a work in progress.  Here's where we're currently at: 


I like the look of layering pictures.  The large picture in the middle is one that we took while in Melbourne.  I got it printed on canvas through canvaspop.  I'm going to switch out the photos in the left frame for photos of Ms. E.  Eventually, I will nail some frames to the wall. 


and the den...


So..both, still a work in progress.  But, it's getting there.

Also to be completed is our laundry area.  It started out pretty miserably:  


The laundry machines were old, inefficient and didn't really clean the clothes very well.  The tile you see to the right of the washing machine was sticky tile that had lost its stick and was then nailed to the wall by the previous owner. 

So far, we've removed the tile and patched these kinds of holes in the wall....


We also replaced the curtain, purchased new high efficiency front-loading machines, and painted the room.  The washer and dryer turned out to be larger than I expected, so the space is really tight.

So, next we'll be stacking the dryer on the washer. 


We'll also finish the tiling on the floor (it's not looking great at the moment - see photo below) and then putting quarter round in this room.  I'd also like to figure out a shelving solution (or perhaps a small laundry folding area, where the dryer currently is, with some storage) and perhaps update the lighting fixture (unlike the previous owners, I'm not a fan of gold finishes).


Lastly, I'd like to figure out some options (tile?) for around the sink area.  Since we use this sink to clean off paint brushes, the wall often gets splattered with paint.  I'd like something that will allow for easy removal of paint.  Any suggestions????


If you've made it this far in the post, kudos to you!  Sorry if it's too detailed.  A lot of my motivation behind the post is selfish -- I just want a reminder of where we've come from and all of the work we did in the house.
StumbleUpon

Sunday, September 23, 2012

Rotisserie Cooking


During the month of July we were asked to promote the  Ronco 5500 Rotisserie Oven . We make it a habit of not promoting a product we haven't tried and before too long I had rotisserie delivered to my home.   We missed the whole promotional period which was in July.  Ronco gave away a rotisserie for each day in July.  I certainly didn't expect to receive anything from them but was eager to try it out when I did.   I was planning a weekend at the cottage and decided that would be a great place to have some  time to give it a whirl.   


It's looking like a pretty cloudy weekend and calling for rain so I doubt there'll be much outdoor activity going on this weekend.  I was right.


We settled in, took everything out of the box and sat down to watch the instructional DVD that came with it.  I'd seen the rotisserie advertised on T.V. several times but really didn't realize how versatile it could be or that it was designed for its ease of operation and healthier eating cooking style.  I really didn't think it would be that easy.  


I took 2 raw chickens, gave them both an ample amount of seasoning, put them on the rotisserie spit.  I put some tin foil on the catch pan but not on the pan that goes above it.  There's also a warning not to use sprays in the oven.  Fit it into the oven and turn it on for 15 minutes a pound.  It has what's called a perfect preset temperature with a precision rotating speed that makes sure that the cooking is even.  It juices itself and gets rid of fat.  What I appreciate is that it uses only 1/3 the power of a regular stove.


After approximately 1 1/4 hours we had gorgeous looking chicken with the skin perfectly browned and the inside properly cooked and very moist.  The manufacturer recommends that you check the internal temperature with a thermometer.


Yes the chicken was delicious.  The next trip to the cottage we'll try a roast or some fish or maybe even some spare ribs.  There's a wealth of possibilities.  There are other accessories you'd need and can purchase them off the Ronco website.

The Ronco Rotisserie oven is fantastic for the cottage.  Do I want it in my condo?  I'd love it but space is an issue.  If you have easy storage for a large counter top oven, you'd use it and probably often.  Clean up should be really soon after cooking.  We cleaned it right away and found it reasonably quick.  
I'm looking forward to putting a roast in the oven and experimenting with different rubs and marinades.  


StumbleUpon

Thursday, September 20, 2012

Tortillas to the Rescue Cookbook


On the heels of Psychgrad's most recent post introducing our Miss "E", I have to admit that there are many changes happening in our family. Beside the obvious addition of "E" who has brought joy beyond what words can even describe, a dynamic has changed. We're still a mother/daughter blogging team with frequent input from Psychgrad's significant other "R". The change that I'm seeing is in the way we think about food.  Our consciousness about food seems far more thoughtful at both the planning and especially the purchasing stage.   I actually like the evolution as we share information and keep learning from one another

 I recently received a promotional copy of Tortillas to the Rescue


Written by Jessica Harlan, the book offers the whole gamut from Breakfasts to Sweet Endings.  There's nothing complicated about this cookbook, just good common sense and accessible ingredients.  Tortillas are always on my grocery list.  Looking for a quick breakfast like a Bacon, Egg and Cheese Roll, a heartier lunch or dinner like a California Burrito or a unique dessert like a Pineapple Cheesecake with Tortilla crust you'll find them in this book.

We were looking for something balanced and easy to make and found  these Burger Pouches that did the trick for us.


1 lb. ground beef
1/2 tsp Worcestershire Sauce
1/4 tsp. garlic powder 1/4 tsp. kosher salt
1/4 tsp. black pepper
4 large (10-12" flour tortillas)
4 slices American or Colby cheese
4 slices globe tomatoes
4 lettuce leaves (iceberg or romaine)

Note:  You can easily add your own special ingredients and achieve a great result.

1.  Place the beef in a bowl and use clean hands to mix the Worcesershire sauce, garlic powder, salt and pepper into the beef.  Form the beef into 4 patties about 1/2 inch thick,

2.  Heat a grill or a grill pan over medium-high heat.  Grill the burgers until cooked through but still barely pink on the inside, 6 to 8 minutes, turning once.

3.  Place a piece of cheese in the middle of each tortilla.  Place the burger on the cheese, then the tomato and lettuce over the burger.  Beginning with one side of the tortilla, fold the edges of the tortilla gradually over the burger, overlapping the edge of the previous fold to cover the filling completely.  Heat a contact grill or panini grill over high heat.  Place the burger pouches on the grill, folded side down and press the top grill lightly over.

** We didn't have a grill pan so we improvised and instead of a panini press, we used a fry pan and another pan on the top.  Worked like a charm.

My latest obsession in snacking is a really simple Peanut Butter and Banana tortilla wrap; with jam or jelly, without, it really doesn't matter; it's all good and the kids will love it too.  This is a really great way to get young children involved in the kitchen.  There's absolutely no deferred gratification with a filled tortilla; easily mastered in less than a minute.


StumbleUpon

Thursday, September 13, 2012

Meet Baby E


Holy moly - time is flying. It has been over a month since I posted...and here's my favourite reason for my silence:


Baby E is almost 6 weeks old now and is changing every day. She's starting to track objects with her eyes and give little smiles. E took her sweet time joining us (10 days late).  But the labour and delivery went smoothly.  She was born at 6:10pm and because we had a midwife birth, we were home from the hospital by 9pm.  

Here's one view of her nursery.  Eventually I'll start her off with naps in her crib.  But for now, she sleeps in our room. The curtains and rug come from Ikea.  The decal is from Etsy.  The crib is from Sleepy Hollow (not shown is a dresser also from Sleepy Hollow).  The glider and ottoman are from Kijiji.  


E sleeps relatively well.  Many nights she'll have a 5-6 hour chunk of sleep.  Since she's growing well (over 10 lbs at 4 weeks, from 8 lbs 9 ounces at birth), I don't wake her for feedings.  But some nights are more trying with little sleep and lots of screaming (from E, not me).

This past week, Giz came to Ottawa and hosted a meet and greet.  


Between visiting with guests and taking care of E, I didn't have a lot of time to take pictures (I really need another arm/hand).  But here are a few pictures of the food:

Antipasto platter:


Boston Cream cake from Rideau Bakery (a big hit):


Mixed pastries also Rideau Bakery:


Half-eaten spread...including wraps (varieties: chicken, turkey, tuna, salmon, and roasted veggies), one of Peter's tyropitas, fruit platter (not visible in picture), black bean salad (also not visible in the picture).


StumbleUpon

Wednesday, September 5, 2012

Peach Ice Cream for September Virtual Cooking Club


I'm not entirely sure where August went and how it is that we're in September.  For that matter, what happened to the summer?  I'm in total denial that the leaves are changing colour, the days shorter and the nights cooler.

September is my family's busiest month of the year.  It's birthday month.  We all have at least one of those months; you know what I mean.  This September is a very special birthday month.  My mother is celebrating her 90th birthday.   For mom's big day I've decided to make her one of her favourite treats.  She loves peaches and loves ice cream so what could be better than fresh peach ice cream

Making your own ice cream is simple, fun and gives you a world of options.  Don't be afraid to experiment.  I don't believe there are many commercial ice creams that taste nearly as fresh while leaving out alot of the fat content.


  • Yield: 8 servings (serving size: 1/2 cup)

Ingredients

  • 3 cups sliced peeled peaches (about 1 1/2 pounds)
  • 1 cup half-and-half
  • 1/2 cup sugar
  • 1/2 cup whole milk
  • 1 teaspoon vanilla extract

Preparation

Place the peaches in a blender or food processor; process until finely chopped. Combine peaches and remaining ingredients in a large bowl. Pour peach mixture into the freezer can of an ice-cream freezer; freeze according to manufacturer's instructions. Spoon ice cream into a freezer-safe container; cover and freeze for 2 hours or until firm.


StumbleUpon
LinkWithin Related Stories Widget for Blogs
Share/Bookmark