Wednesday, November 30, 2011

Preserving Tomato Sauce


In my last post, I talked about some lessons learned related to growing tomatoes.  But, I think I left out the biggest lesson learned:  grow plum tomatoes!

Plum tomatoes are used in so many recipes that it is easy to find ways to use them up.  Not to mention that I spent quite a while trying to figure out where to buy a bushel of plum tomatoes, including contacting local farmers, Loblaws and Farmboy. Some of the prices are a bit hard to take, knowing that Giz is able to find a bushel for $20 in Toronto. In the end, I went with the 1/2 bushels sold at Parkdale market for $15.

On our first tomato day, Ron (whom I've mentioned before, here) set out to can tomato sauce.  We started by washing and coring the tomatoes.


Next, we scored the tomatoes by making an "X" shape at one end of the tomatoes and blanched the tomatoes to peel them.


We had enough to make a double recipe of this tomato sauce:

Seasoned Tomato Sauce

12 cups chopped ripe plum tomatoes (about 6 lb/3kg), unpeeled
1 cup chopped onion
2 cloves garlic, minced
2 tbsp chopped fresh oregano or 1 tsp dried
1 tsp granulated sugar
1/2 tsp freshly ground black pepper
2 bay leaves
2 tbsp red wine vinegar or lemon juice
1/2 tsp pickling salt

1. Combine tomatoes, onion, garlic, oregano, sugar, pepper and bay leaves in a large stainless steel or enamel saucepan.  Bring to a boil over high heat, reduce heat and boil gently, uncovered, stirring occasionally, for 1.25 hours of until very thick (note: you can determine your preferred level of thickness).


Press through a food mill or coarse sieve; remove and discard seeds and skins.  (Note: I didn't do this because I wanted a diced tomato texture and had already removed the skins via blanching).   Add vinegar and salt to pulp.    

2. Prepare jars in water canner (I let my jars sit in a rolling boil for about 20 minutes).  Remove hot jars from canner and ladle sauce into jars to within 1/2 inch (1 cm) of rim (headspace).  After reading about tomato sauce separating here, I was careful about only removing jars one at a time and then replacing the filled jar to the water canner while filling the remaining jars.  Process for 35 minutes for half-pints (250mL) and pint (500 mL) jars.

Makes about 7 cups (1.75 L).  I got about 6- one litre jars from a double recipe.


Note: the above picture was taken the day after I canned the sauce.  When the jars have cooled and the lids have sealed, I removed the rings.

Since making these 6 litres, I made another double recipe with a separate half bushel.  Then, I went to a friend's place and showed her how to make tomato sauce.

I made the tomato sauce in September and I've since used a couple of jars. The flavour is great and it is quite a treat to have sauce on hand that is home-made.  Next year, I plan to make more so that I don't have to eat it sparingly to ensure that it lasts the winter.
StumbleUpon

Sunday, November 27, 2011

Cauliflower and Broccoli Bake with Toasted Almonds


I have a great brother. How's that for an opening line? Seriously, my brother is one of those guys who always knows exactly how to chose the best gift for whoever he's buying for. The especially nice thing is that he can show up one day and say "I have something for you" and there isn't an occasion attached to the gift. How special is that? During a trip to Victoria, British Columbia he came back with a couple of exceptional cookbooks written by Canadian west coasters.

The book Quinoa The Everyday Superfood 365 by Patricia Green and Carolyn Hemming will expand the way think about meals made with quinoa. This superfood can be breakfast, lunch, snack, dessert and is totally versatile with other flavours. You can include it in the kids' meals and they won't even know they're eating "good for you" eats.


Ingredients

3 cups cauliflower florets
3 cups broccoli florets
2 cups milk
1/4 cup quinoa flour
1 tsp prepared mustard
1/2 tsp minced fresh garlic
1/2 tsp salt
1/4 tsp pepper
pinch groung nutmeg
1 cup shredded aged cheddar cheese
1 cup sliced toasted almonds

Method:

Ensure you move the top oven rack to accommodate a 9x13 casserole dish, with a second rack underneath to toast the almonds.**
Preheat oven to 350 F and grease or spray a 9x13 casserole dish
Steam the cauliflower and broccoli together in a large saucepan until just barely tender. Place them in the bottom of the casserole dish.


Combine the milk, quinoa flour, mustard, garlic, salt, and nutmeg in a medium saucepan over low heat. Simmer whisking the mixture until the flour is well blended. Add the cheese as the mixture begins to thicken. Continue cooking and whisking until the cheese is melted and the mixture is smooth and coats the back of the spoon. Pour the sauce over the vegetables.

Bake the casserole in the oven uncovered for 20 minutes until hot and bubbly.
After the casserole has baked for 13 minutes, toast the almonds on a small baking dish on the bottom rack of the oven. Toast the almonds for 7 minutes until fragrant and slightly toasted.


Remove both the casserole and the almonds and sprinkle the almonds generously on top of the casserole and serve immediately.


For me it was a whole meal but honestly a wonderful side.


** Note: Although the recipe suggested toasting the almonds in the oven, I did them in a dry frypan.

Links:

Facts about Cooked Quinoa
Nutritional Facts About Quinoa StumbleUpon

Thursday, November 24, 2011

Overnight Chicken Stew with Israeli Couscous


My culinary bucket list is loaded with international recipes I have yet to experiment with. Israeli food has been near the top of my list because the food of Israel embodies flavours and methods that have, over the years, been a melding pot of many different countries.

Inspired by Israeli Kitchen , my friend "L" gave this recipe for Overnight Chicken Stew with Israeli Couscous a try and raved about the outcome.


Serves 6 – easily halved

Ingredients:
2 cups – 500 grams Israeli couscous
2 medium onions, chopped
Olive oil
Salt and black pepper
1 tablespoon paprika
2 teaspoons ground cumin
1 bay leaf

*Optional: 1 tiny red chili, or 1/2 teaspoon cayenne flakes
4 cups boiling water plus 1/2 cup later
*Optional: 4 medium potatoes, thickly sliced
1 entire, jointed chicken or 6 leg and thigh pieces

Method:

Rub salt and olive oil into the chicken pieces. In a large pot, fry on the chicken on all sides in 2 tablespoons olive oil. Remove from pot.

Add 1/3 cup oil to the pot and in it, gently fry the onions till they’re very soft and golden.

Add the Israeli couscous stir, and fry for 3 minutes.

Add the 4 cups of boiling water. Stir, taste for seasoning and add salt and pepper. Cover and cook 8 minutes.

Remove from heat and fluff the Israeli couscous up with a fork. Let it cool somewhat and then remove it from the pot to a bowl.

Wash the pot out, dry it, and line it with parchment paper. If adding potatoes, put a layer of raw potatoes down in the pot and up around the sides, till they’re all used up.

Put half the Israeli couscous in the pot (on top of the potatoes, if using). On top of it, place the chicken pieces. Add the paprika, cumin, bay leaf, and optional chili.

Top with remaining pasta and add 1/2 cup hot water.

Cover all with baking paper. If you wish to cook eggs in this stew, either place them alongside the chicken pieces or on top of this baking paper cover. Cover the pot with its lid and make sure it’s down tight. If necessary, wrap tin foil around the top to make sure no steam escapes.

Bake overnight in oven set to 215° F – 100° C, or 4 hours at 300° F – 150° C. I put mine in at about 11 p.m. and took it out at about 9 a.m.

Verdict:
I loved the method. So easy with simple ingredients and is one of those recipes that you can add additional vegetables, mushrooms and a variety of spice to. When you wake up in the morning, the incredible fragrance of cumin fills your home and one could be tempted to eat it for breakfast (just sayin')
"L" actually added bacon bits to the potatoes on the bottom and said it was a 5 Star addition and had everyone fighting for the potatoes.

I'm sending this recipe over to Frugal Recipes for the next submission of easy to make recipes with simple ingredients. If you missed the last roundup, you can find it HERE StumbleUpon

Monday, November 21, 2011

Burekas


A few months ago I was inspired to experiment with hand pies, both sweet and savoury. It is, after all the Year of the Pie . Hand pies are not new but of late I've noticed a huge revival of their popularity. Different doughs, different fillings, various cultures with their own form of pie and each has its own identity.

While travelling through the middle east years ago I was introduced to a savoury form of hand pie called Burekas; flaky and delicious and found made by home cooks, restaurants and street vendors. I was so hooked it was ridiculous. I couldn't pass a street vendor without buying one. I know, I'm sad. With the aid of Tenderflake Puff Pastry I can now whip up a batch in short order or freeze for a later date.


There are a multitude of fillings one can use but my very favourite is a combination of feta and mozarella cheese.

1/2 cup feta cheese, crumbled
1 cup grated mozarella cheese
2 eggs
1 pkg. Tenderflake puff pastry
1 egg yolk, slightly beaten
1/4 cup sesame seeds

Turn oven to 350 F
Roll out each piece of puff pastry separately to cut 6 even squares. If you prefer a thinner pastry, you could roll it thinner.
Place 1 heaping Tbsp of filling to the center of each square bringing two opposite points together; pinch. Using a floured fork pinch all the way around the joined area.
Place bourekas on a parchment lined cookie sheet. Brush tops with beaten egg yolk and sprinkle with sesame seeds.

Bake for 20 minutes or until golden brown.


OMG, I'll bet you can't have just one.


Note: If you don't want your burekas to be too salty, rinse feta before crumbling and add more mozarella to offset the saltiness.
StumbleUpon

Thursday, November 17, 2011

Pumpkin, Cranberry, Walnut and Currant Bread


I love pumpkin. I haven't met a pumpkin dish that I didn't like. My very favourite recipes using pumpkin are pies and breads. Moist and flavourful, appropriate for so many different occasions, breads always seems to draw positive comments often related to memories of home.


There are so many recipes available for pumpkin bread but this one, because it's loaded with so many different textures is really my very favourite.

  • 3/4 cup butter or margarine, softened
  • 2 cups sugar
  • 3 eggs
  • 2 cups pumpkin (I used fresh)
  • 1 1/2 teaspoons grated orange peel
  • 3 1/2 cups all-purpose flour
  • 2 teaspoons ground cinnamon
  • 1/2 tsp ground ginger
  • 1/2 tsp nutmeg
  • 1/2 tsp cloves
  • 1 teaspoon salt
  • 1 teaspoon baking soda
  • 1/2 teaspoon baking powder
  • 1 cup chopped walnuts or pecans
  • 1 cup chopped fresh or frozen cranberries
  • 1/2 cup currants
  • In a mixing bowl, cream butter and sugar. Add eggs, one at a time, beating well after each addition. Add pumpkin and orange zest; mix well (mixture will appear curdled). Combine the flour, cinnamon, salt, baking soda and baking powder; add to pumpkin mixture, beating on low speed just until moistened. Fold in nuts, cranberries and currants.. Pour into two greased 8-in. x 4-in. x 2-in. loaf pans. Bake at 350 degrees F for 65-75 minutes or until a toothpick comes out clean. Cool for 10 minutes before removing from pans to wire racks.


  • Enjoy! No disappointments, I promise.
    StumbleUpon

    Monday, November 14, 2011

    Oven-Roasted Tomatoes


    This was my second year of gardening. Although it's still a learning process (which I intend to post about in the near future), it was definitely more productive than my first year. Here are just some of the tomatoes I pulled from the garden:


    As the tomatoes kept coming, I knew that there would be no way for me to eat all of them before they went bad. So, I decided to oven roast and freeze some of the small and medium tomatoes.


    Oven-Roasted Tomatoes

    olive oil
    tomatoes, sliced in half
    garlic, crushed
    salt and pepper


    Preheat oven to 200F.

    Place tomatoes, slice side up on cookie sheet. Drizzle with olive oil. Spread garlic over top and add salt (sparingly) and pepper. You can, of course, experiment with whatever other herb flavours you'd like.

    The tomatoes will slow-roast. I kept mine in for about 2.5 hours. But, take a look at them every once in a while and remove them when they're done to your liking.

    Lesson learned: used parchment paper.


    Gardening Notes:

    Although I was thrilled to have a better crop of tomatoes this year, 95% of the yield came from 2 plants that had prime property in the sun and the remaining 8 plants were lackluster.

    Next year, I'm going to make sure the tomatoes have a better spot in the sun, keep on top of the plants that are growing like weeds and pinch off plants to keep my green tomatoes a fighting chance of ripening as it gets later in the season; I ended up with a lot of green tomatoes at the end of the season.

    StumbleUpon

    Friday, November 11, 2011

    Apple Butter Apple Pie


    Are you looking for a dessert recipe for American Thanksgiving?  This one is a winner!

    Giz and I made it for Canadian Thanksgiving last month.  I was inspired by Sugar Plum's Apple Butter Apple Pie recipe.  Specifically, the apple butter portion was particularly enticing, since both Giz and I had recently made apple butter.


    Apple Butter Apple Pie

    6-7 cups thinly sliced peeled apples 
    1/2 cup apple butter
    1 teaspoon ground cinnamon
    1/2 teaspoon ground ginger
    1/8 teaspoon ground clove
    1/3 cup white sugar (optional -- we added this to the recipe)

    Heat oven to 400 degrees F. 


    Roll out half of the pie dough, on a lightly floured surface, and fit into a pie dish.  We used this pie crust recipe.   

    In a large mixing bowl, stir together apples, apple butter, sugar, cinnamon, ginger and clove until well combined; pour into pie dish.


    For the top layer, I opted to do a lattice.  It was a first attempt. 


    The lattice looked good, but I wanted to add something more.  Thankfully, Giz has a good selection of cookie cutters, so we re-rolled the dough made some apple cutouts.


    Bake 50-60 minutes or until deep golden brown and bubbly. Cool on a wire rack before slicing.


    The pie exceeded my expectations and passed the Baba test (she sincerely liked it, which is a feat unto itself).


    Here's Kodi, who just turned 12, hanging out in the kitchen after dinner.  

    StumbleUpon

    Wednesday, November 9, 2011

    Great Ocean Road


    Giz has officially passed the blogging baton back to me, so I guess it's my turn to post.   Good thing too because it's definitely time to finish off my trip report.  

    You can read about the rest of our trip here:

    New Zealand

    Part I (Auckland, Coromandel Peninsula & Rotorua)
    Part II (Taupo & Hawke's Bay)
    Part III (Abel Tasman & Franz Josef)
    Part IV (Lake Matheson, Wanaka, Queenstown & Milford Sound)

    Australia


    Sydney: Part I


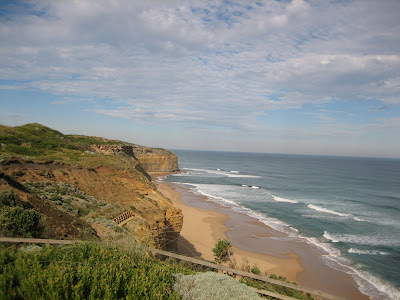
    Now, for the last stop on our trip, the Great Ocean Road.  The Great Ocean Road is about 150 miles of road that travels along the ocean, beginning (or ending, depending on the direction you travel) in Torquay, about 1 hour and 15 minutes outside of Melbourne, and ending in Warrnambool.  The views on this road are stunning.  

    We stopped in Torquay for lunch at the Torquay Larder, a cute little cafe with made-from scratch food and specialty food items.  


    After Torquay, we continued on to the Angelsea Golf Club, which is known for being a location to see wild kangaroos.  


    You don't have to search particularly long to see a whole bunch of kangaroos.  There were about 30 in this shot that I took just outside the main gate.


    Next, we stopped off at the Split Point Lighthouse in Aireys Inlet and took some time to enjoy the majestic views all around.


    There are a few lighthouses along the Great Ocean Road, the most famous is the Cape Otway Lightstation.  We opted not to visit it since they charge $17.50 per person.  But, now I'm kind of regretting it since it looks like the views there are second to none.

    By this point in the day, the sun was starting to set, so we made our way for our hostel, the Apollo Bay YHA.  We practically had the place to ourselves by this point (3rd week in May).  But apparently it books up over the summer.

    The next morning, we started off at Maits Rest Rainforest Trail, a quick walk along a rainforest boardwalk.


    Gotta love the  driving reminders:


    Next, we started the search for wild koalas amidst the eucalyptus on the road toward the Cape Otway's Lightstation.   Definitely like looking for a needle in a haystack.  We were about to give up, but spotted some cars along the side of the road.  Bingo!  


    No trip to the Great Ocean Road is complete without seeing the Twelve Apostles.  


    Don't bother trying to count all twelve apostles (the limestone rock stacks).  There are only about eight left.


    We both agreed that we should have spent an extra day on the Great Ocean Road.  Still, it was a great way to close out our trip. 

    We returned Melbourne that evening and caught a flight to LAX the next day.  


    I could have done without the 47 hour return voyage to Ottawa, which included spending the night sleeping in  the Chicago Airport and having to fly to Montreal and bus to Ottawa after flights were delayed and sold out.  But, we'll just forget about that part and call it an excellent trip!  

    I hope you enjoyed my posts about Australia and New Zealand!  Thanks for sticking them out with me.
    StumbleUpon
    LinkWithin Related Stories Widget for Blogs
    Share/Bookmark