Showing posts with label dessert. Show all posts

Thursday, August 20, 2015

E's 3rd Birthday


I won't even apologize for a lack of posting.  Our lives have changed enough that posting isn't a priority anymore.  But, every so often, I get inspired to post; mainly to document something from our lives.

It's strange how one day you're announcing the birth of your firstborn...and then the next it's his/her 3rd (10th...20th..25th..) birthday.

1st Birthday


2nd Birthday


A few days ago, we celebrated E's 3rd birthday.


I finally got to use the cupcake cake form that Giz decided should live at my house.  I used Barefoot Contessa's Ultimate Chocolate Cake recipe.  I was worried that the batter was too liquidy and would fall apart once removed from the pan, but everything came out perfectly.


Actually, this was her second birthday cake, since we had an early birthday celebration in Toronto, with a Minion-themed family birthday party.


Our friends came over for dinner on her birthday and I tried out a new recipe, 20 Minute Skillet Chicken and Spinach Parmesan.  It was a yummy recipe that I would definitely use again.


StumbleUpon

Monday, April 27, 2015

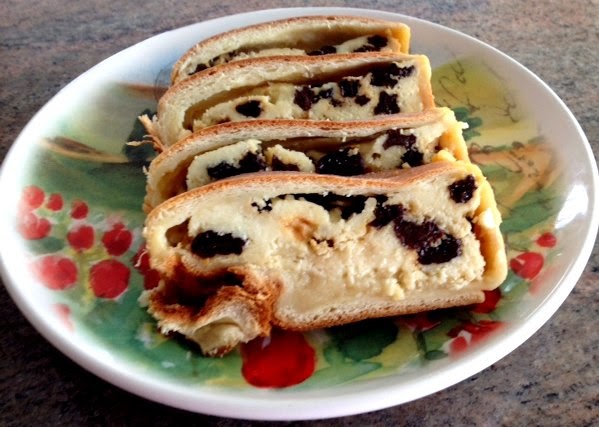
Cheese Babka


I just returned from trip #3 to Poland.  This trip was quite different than the others.  We weren't on our genealogical journey this time; we were there for Actor Boy's marriage to the lovely "M".  If you believe in fate, this union is one to put in the journal.  Both AB and M were attending the same conference, she from Warsaw and he from Toronto and met in Montreal.  Although many say that long distance relationships are particularly challenging, this one seemed to thrive and after many cross Atlantic visits for extended periods at a time, they decided to tie the knot.

Each trip reminded me of my European roots; the phrases people use to describe things, the quirky shared history that summons both grief and uncontrollable laughter, words in a foreign language that I remember hearing my parents say and most familiar - the food.  I would often think to myself that I used to have this or a version of it at home. And the pastries - simple, plentiful (every street corner type of plentiful) and delicious.  It's easy to see how I developed a love for, no... love isn't exactly the word, it's more like obsession for European cuisine.  It started with Polish recipes and has now spread to the rest of Europe and moving into Asia.  I keep thinking that one of these days my European recipes on Pinterest will just explode but for the time being, we'll go through them one at a time.  It's a good thing there's a fair amount of overlap in European cuisine; often different names for the same thing with maybe just a little twist here or there.  Some recipes have ingredients that are similar but not the same as North American varieties so the challenge is always to recreate flavours with twists here or there.  Sometimes it works, sometimes not so much.

Today I decided to give the Cheese Babka a whirl.  Even the name "babka" is endearing - it means "grandmother" so we associate this sweet with a kindly old grandmother kneading and filling pastries for her family to enjoy.  What could give you a warmer feeling of home than that vision?  Afraid of yeasted doughs?  Don't be.  This recipe is so simple and the hardest part of the whole thing is waiting for the dough to rise.


Dough:

2 pkg active dry yeast
1/2 tsp and 1/2 cup sugar
1/4 cup 110 degree water
1 cup milk
4 oz. (1 stick) softened butter
1 tsp salt
3 large beaten egg yolks - reserve 1 egg white for basting top before baking
5 cups all-purpose flour

Filling:

36 oz. softened cream cheese ***
3 large egg yolks
1 1/2 cups sugar

Crumb Topping

8 Tbsp all-purpose flour
8 Tbsp sugar
4 Tbsp cold butter

*** The cream cheese in this recipe is a dry curd cheese or quark cheese that's a full milk variety and when you mix it, becomes very smooth and cream cheese like.  Don't use the Philadelphia style cream cheese.


Prepare 3 - 9x5 bread pans (you can either spray them or grease with a little canola oil)

Preparation:

Stir the yeast and 1/2 tsp sugar into warm water.  Set aside until frothy.

Scald the milk and place in a large mixing bowl or stand mixer.  Add soften butter and stir to melt.   Add 1/2 cup sugar, salt, yeast mixture and the 3 beaten egg yolks.

Add the flour and knead until shiny and elastic.  Place in a greased bowl, turning to coat both sides; cover with greased plastic wrap and let rise until doubled.  This could take a couple of hours.

The Crumb Topping

Mix the flour and sugar and cut in cold butter as you would for a pie crust until it's crumbly.

Assembly

Punch down dough and divide into three equal parts.  Working with one part at a time while covering the rest, roll into a large rectangle 1/8 - inch thick.

Spread dough with 1/3 of the cheese filling.  Fold the short sides towards the centre (about1 1/2 inches of dough) and roll up the long side away from you.( the way you would make a jellyroll)  Place into prepared bread pan.

Brush with beaten egg white and sprinkle with 1/3 of the crumb topping.  Repeat with remaining two dough balls.  Cover with plastic wrap and let rest until the dough rises above the rim of the pan.

Place the rack in centre of the oven and heat to 350 F.  Bake babkas for 40-50 or until an instant-read thermometer registers 190 degrees.  Let cool in pan for 5 minutes.  Using a knife, loosen babka from sides of pan.  Cool completely in the loaf pan.

There's always some learning when we follow a recipe for the first time.  I learned:

1.  Make sure there isn't an overabundance of moisture in your final mixed cheese filling.
2.  Don't be impatient with the rising process.  It takes as much time as it takes and works better when your dough is in a warmer part of your kitchen.
3.  Just because you may like raisins, overloading the babka with goodness isn't always going to get you the outcome you're looking for.  I think I went a little crazy on the raisins.
4.  I didn't put the crumble on the top - I think having it there would have been a good addition  OR I can still put icing sugar over the top.
StumbleUpon

Sunday, April 13, 2014

Passover Mandelbrot


Passover, like most holidays seems to creep up quietly and then all of a sudden it's busy kitchen to the power of 10.  I really love this holiday but honestly, it's alot of work.  Anyone who tells you differently isn't the one doing the cooking.  Thank goodness for my sister (aka Auntie Takeout) who's stepped forward and is taking on alot of the work.

We cook at our own homes and then do the schlep to baba's place.  It's actually easier to do it this way than try to bring my mom to one of our homes.  It also leaves baba with enough leftovers for a week's worth of meals.  This year I'm doing the sides and desserts.
One of the desserts this year is mandel brot.   This recipe is a first timer for me and until now I had no idea how simple it is to make and I know baba will love these cookies.  They're really like a smaller and softer version of biscotti.  You also don't need a mixer for these - easy to put together by hand.

3 eggs
1 cup sugar
1/2 cup oil
1 1/2 cup cake meal
1/2 cup potato starch
1 cup chocolate chips

Preheat oven to 350 F.
Line cookie sheet with parchment paper
Whisk eggs and add sugar, continue whisking until well blended
Slowly incorporate oil and then both cake meal and potato starch
Stir in chocolate chips
Let mixture sit for 15 minutes
With oiled hands form 3 long logs (the mix will be sticky)
Bake for 30 minutes.  Take out logs and cut into approximately 12 slices per log and return to oven for 5--10 minutes to dry.


Fantastic!


StumbleUpon

Thursday, April 3, 2014

Lemon Cranberry Muffins


Why am I craving lemons?  It was a total mystery to me but I went a couple of days wishing I had something with lemon in it. After doing some reading about lemon cravings and quickly ruled out pregnancy I read that it's not uncommon for people who have difficulty sleeping and/or not enough magnesium to have this craving.  Interesting, no?  I've always had to take magnesium supplements so maybe there's something to it.

I stood in front of the open fridge and just took a mental inventory of what was there and I had some lemons and also some fresh cranberries.  Hmmm... now what?  I found a recipe for Lemon Cranberry Muffins.

I can't believe this was the first time I'd ever made this variety of muffin.  It's easy (my favourite), you do it all by hand and it takes 5 minutes to put together.  That's a good recipe!


2 cups all-purpose flour
1 Tbsp. baking powder
1/2 tsp salt
3/4 cup sugar
zest of 1 lemon
juice of 1 lemon
1 cup (I used more) fresh cranberries
1 cup milk (I used 2%)
1 egg
1/4 cup oil

Preheat oven to 400 F
Sift flour, baking powder and salt together
In a separate bowl mix sugar with lemon zest mixing well to incorporate zest to sugar, add to flour mixture
In a measuring cup pour in milk and lemon juice; allow to sit for a few minutes (it'll look like buttermilk)
Add egg and oil and whisk all together  
Make a well in the dry ingredients, add liquid and stir only until blended, add cranberries

If you have large muffin tins, spray one tray of six with non stick and scoop even amount to each one. The smaller muffin tins (12/tray) will work also, just adjust baking time accordingly.
Bake large muffins for 23 minutes (depending on your oven); mine were done in 20 minutes 


NOTE:  These muffins are so good and I'd compare them to any good lemon cranberry muffins anywhere! They're not dry, cake like with a twist of tang.
StumbleUpon

Wednesday, July 10, 2013

Strawberry, Red Currant & Vanilla Cream Parfait


Want to know how to stress me out?  Invite me for dinner, ask me to bring a dessert and then say something like, "I like how you always put effort into your desserts and try new recipes!"

That's what my friend said to me when she invited me over for a Canada Day barbecue.  Sure -- it's a compliment.  But, it also clearly sets up an expectation that I need to maintain a reputation by making something impressive. 

The other part of my (first world) stress was that I had gone strawberry and red currant picking the day before and was busy trying to preserve 20 litres of fresh fruit.  


I have had the idea of making a layered dish in individual mason jars in mind lately.  Since I already had jars out for preserving, I thought this would be a good opportunity.  Plus, it's easily transportable, which works well when you're bringing dessert to a friend's. 

Strawberry, Red Currant & Vanilla Cream Parfait


I started by making the vanilla cream and refrigerating it.


Vanilla Cream

2 large eggs yolks
1/4 cup sugar
2 tbsp + 1/2 tsp cornstarch
pinch of salt
1 cup of whole milk
1/2 tsp pure vanilla extract

Directions

Whisk yolks until smooth.  Mix sugar, cornstarch, and salt in a medium saucepan over medium heat.  Add milk in a slow, steady stream.  Cook, stirring, until mixture begins to bubble and thicken, about 5 minutes.

Pour 1/3 of milk mixture into yolks, whisking constantly.  Return mixture to saucepan, and cook over
medium heat, stirring often, until thick, 2-4 minutes.  Stir in vanilla.


Pass vanilla cream through a fine sieve into a bowl.  Press plastic wrap directly on surface.  


Refrigerate until cold, at least 1 hour, or up to 2 days.

The rest was really simple.  I used some of the fruit I had picked in layers between vanilla cream, Nutriwhip and ladyfingers that had been soaked in milk.


Prior to layering the dessert, I debated between 250 ml and 500 ml jars.  In the end, I went with the 500 ml.  They are a generous size, but the whipped cream takes up so much space, 250 ml wouldn't go very far.

Verdict: Everybody liked the dessert.  I think the kid inside of all of us likes the idea of having your very own jar of goodness.  The red currants made for a nice punch of tartness.  The only issue I had was that the layers were kind of all mushed together. It didn't matter taste-wise.  But it didn't quite have the visual effect I was going for. StumbleUpon

Friday, June 28, 2013

Jeanne's Cake


Google Reader is shutting down this weekend. I've decided to move over to Bloglovin. You can follow me through Bloglovin here.

==============================================

It's funny how our tastes can be influenced by what we grew up with.  You may recall me mentioning Jeanne's Bakery in the past.  It's a well-known bakery in Winnipeg that makes a distinctive cake with a cookie bottom and chocolate shavings on the side.  For many Winnipegers, Jeanne's is a staple for any celebration.  

The thing about Jeanne's cakes is that most people, who try it for the first time as an adult, are pretty unimpressed with the cake.  The cake itself is pretty dry.  It gets worse if you put it in the fridge (freezer or counter storage only).


The flavour isn't particularly strong.  It's not even that nice to go to the bakery itself.  It doesn't have that typical bakery smell that entices you to add a couple of treats to your order.

Despite all of this, it's a hugely popular cake and is one of the few food items I will add to the request list when family is coming to Ottawa for a visit.

Recently, my dad and stepmom came to visit to celebrate Father's Day and my dad's birthday. Somehow bringing a Jeanne's cake wasn't added to the "bring to Ottawa" list.  So, my stepmom and I decided to take matters into our own hands.

Jeannie's Cake

Base
1/3 cup shortening
1/4 cup icing sugar
1 teaspoon vanilla
1 cup all-purpose flour
1/3 teaspoon baking powder
Cake
1/2 cup shortening
3/4 cup sugar
2 eggs
1 teaspoon vanilla
1 1/2 cups all-purpose flour
2 teaspoons baking powder
1/2 teaspoon salt
1/2 cup milk
Frosting
1/2 cup milk
2 tablespoons all-purpose flour
1/2 cup butter
1/4 cup shortening
1/2 teaspoon vanilla
1 cup icing sugar
1 dash salt
Directions:

To prepare base, cut shortening into dry ingredients, mix well.


Pat firmly and evenly into an 8 inch square pan and bake at 350 deg. F. for 10-12 minutes. Cool. 
Note: the base and cake are baked separately.


For cake: cream shortening, and sugar; add eggs and vanilla, beating well until fluffy. Sift flour, baking powder and salt together; add to creamed mixture alternately with milk.


Pour batter into a greased and floured 8 inch square pan. Bake at 350 deg. F for 25 - 40 minutes.


Frosting: in small saucepan, stir tog. milk and flour. Cook, stirring constantly, until mixute is thickened and smooth. Cool.

On highest speed of mixer, beat cooled flour mixture with butter, shortening and vanilla until smooth and fluffy.

Blend in icing sugar and salt; continue beating until frosting is very fluffy. This will take at least 15 minutes.


To assemble cake: place shortbread base on serving plate; spread with small amount of frosting. Place cake on base. (you can split the cake for layers).
Cover top and sides of cake with remaining frosting. If desired, garnish sides of cake with shaved semi-sweet chocolate. Note: If you are decorating your cake, it is best to add the shaved chocolate beforehand.


Note: we found that the chocolate was easiest to shave when it warmed up a bit.  Next time, I'd probably try freezing it after shaving so that it doesn't melt in my hands when pressing it onto the cake quite so much.  Any advice on how best to do this is welcome!


Verdict: Well...it's the closest thing to a Jeanne's cake I've tasted that wasn't from Jeanne's Bakery.  But, that isn't really a huge feat.  I found the cookie crumb to taste more like shortbread than Jeanne's.  Also, I tasted the shortening in the icing more than I'd like.  The cake itself wasn't as fluffy.  Everyone liked the cake, but I wasn't crazy about it.  I forgot to put icing between the cookie crumb and the cake.  I'd definitely recommend doing this...maybe even a layer mid-cake.  

StumbleUpon

Monday, June 17, 2013

Creamy Blueberry Pie


When I saw this recipe on Bunny's Warm Oven, I immediately thought: annual potluck.  Maybe it's because it has some similar components to the Blueberry Crumble Cake I made for last year's potluck.  I love blueberries.  Who am I kidding? I love custard and crumble too.  Not to mention that it looks delicious. So, I couldn't resist.

We have been longtime followers of Bunny's blog.  She is a great baker and I'm partial to her step-by-step photos of the process.  I'm a visual person and I like to know what I'd be getting myself into. 

I started with making this crust recipe:


Butter Flaky Pie Crust

1 1/4 cups all-purpose flour

1/4 teaspoon salt

1/2 cup butter, chilled and diced

1/4 cup ice water


Directions
In a large bowl, combine flour and salt. Cut in butter until mixture resembles coarse crumbs. Stir in water, a tablespoon at a time, until mixture forms a ball. Wrap in plastic and refrigerate for 4 hours or overnight.

Roll dough out to fit a 9 inch pie plate. Place crust in pie plate. Press the dough evenly into the bottom and sides of the pie plate.

Creamy Blueberry Pie


Original recipe makes 1 9-inch deep dish pie


          cups fresh blueberries


          1 (9 inch) deep dish pie crust
For the Custard: 

1 cup white sugar  (Note: I used 2/3 cup)  


1/3 cup all-purpose flour


1/8 teaspoon salt


2 eggs, beaten


1/2 cup sour cream  (Note: I used 2/3 cup) 
(Note: I also added a tsp. of vanilla and 1/2 tsp. of cinnamon based on recommendations from reviewers)
                 
  
For the Streusel:       
1/2 cup white sugar  (Note: I used half brown sugar and half white sugar) 
         

1/2 cup all-purpose flour
         

1/4 cup butter

(Note: I halved the streusel quantities based on recommendations from reviewers)

Directions
1. Preheat oven to 350 degrees F (175 degrees C). Place the blueberries in the pastry shell and set aside.
2. Combine 1 cup sugar, 1/3 cup flour, and salt. Add eggs and sour cream, stirring until blended. Pour the sour cream custard over the blueberries.


3. In another bowl, combine 1/2 cup sugar and 1/2 cup flour. Cut in the butter with pastry blender until the mixture resembles coarse meal. Sprinkle the topping over the sour cream mixture and berries in the pie shell.
Bake in the preheated oven for 50 to 55 minutes, or until lightly browned.  Cool on wire rack.

(like Bunny, I put tin foil over the pie for the first 20 minutes to avoid over cooking the crust)


Verdict:  The pie was a hit!  It was all gone by the time we left the potluck.  I did have some challenges with it though.  For one, my streusel topping didn't look anywhere near as nice as Bunny's.  Also, I had to cook the pie a lot longer to get the centre to finish cooking.  I knew it would get harder once it cooled, but it was just too liquidy for my liking to take it out at the directed time.  Lastly, I kind of wished that there was a more prominent vanilla flavour with the custard.  I added vanilla to the recipe.  But, I didn't taste it much after it finished baking. Still, the pie tasted great.


StumbleUpon
LinkWithin Related Stories Widget for Blogs
Share/Bookmark